Facebook retargeting is one of the most powerful ways to increase conversions. It works great for all kinds of businesses and products and it’s also cost-effective.
In this guide, you’ll learn how Facebook retargeting works, how to create a retargeting strategy, and how to set up and optimize Facebook retargeting ads.
What are Facebook Retargeting Ads?
Facebook retargeting ads are shown to a specific group of Facebook users who are already familiar with your brand. By creating custom audiences on Facebook, you can re-target users who visited your website (even specific pages) or interacted with your Facebook or Instagram page.
Facebook retargeting ads are very powerful because you can show different ads to users based on their actions. For example, you can re-target people who visited your checkout page but did not complete the process with discount codes.
With Facebook retargeting, you can get more people to visit your local store, generate more leads from Facebook and increase sales of your eCommerce store.
The main benefits of using Facebook for retargeting purposes are:
- You can reach audiences who already know your brand.
- You can personalize ads for each audience or even for each customer using dynamic ads.
- You can retarget people who have already become customers with new product offerings.
- It’s a great way to reduce your customer acquisition costs (CAC) since retargeting ads cost less than any other type of paid ad.
- It’s a process that can be fully automated. Once you create and optimize your Facebook retargeting campaigns, you can leave them running without too much ongoing maintenance.
Facebook ads can appear on all available places on Facebook and Instagram like the news feed, groups, stories, marketplace, and forums.
How Does Facebook Retargeting Work?
Facebook retargeting works by giving Facebook details of the people you would like to retarget through Facebook or Instagram ads. This can be done in different ways, depending on the nature of your business.
The most common ways are:
By uploading your customer list on Facebook – This can be a list from your CRM, email software, or eCommerce platform. The list should include the name and email of customers (mandatory) and other optional information like their address or Facebook ID.
Once the list is uploaded, Facebook will try and find which of your customers have Facebook accounts and show them your ads while on Facebook. The more information you can provide to Facebook, the greater will be the chances of finding a matching account.
By creating custom audiences using the Facebook pixel – If you’re goal is to retarget your website visitors then you need to install the Facebook pixel on your website. Facebook will try and match your website users with Facebook users using AI technology.
The additional advantage of using the pixel is that you can create different audiences based on the actions users take on your website. Additionally, with the pixel properly configured you can track the performance of your retargeting ads.
By sending data to Facebook through the Facebook SDK – If you want to retarget users based on their app activity then you can use the Facebook SDK to give Facebook details about the users you want to include in your retargeting campaigns.
How to Create a Facebook Retargeting Campaign
These are the 5 steps to follow to start a retargeting campaign on Facebook from scratch.
- Create a Facebook Business page
- Add the Facebook pixel to your website
- Create custom audiences
- Setup conversion tracking
- Create a Facebook remarketing campaign
- Create remarketing ads
- Monitor the performance of your remarketing ads
1. Create a Facebook Business page
The first step before starting a retargeting campaign on Facebook is to create a Facebook Business page.
Although this is not a requirement, it is highly recommended. The main reasons are:
More professional: It’s more professional to run the retargeting ads through your business profile and not your personal profile.
Facebook displays the profile image of the person/business running the ads and having your business logo on the ads is the recommended approach.
Brand awareness: It’s another opportunity to remind users that will see your ads of who you are.
Establish your Facebook presence: Any business whether running paid ads or not should have a presence on Facebook and the best way to do that is by creating a business page.
So, if you don’t already have a Facebook page, go ahead and create one. The process is easy, it only takes a few minutes and it’s free.
2. Add the Facebook pixel to your website
The next step to getting started with retargeting is to add the Facebook pixel on your website.
The Facebook pixel is a piece of javascript code that allows Facebook to associate your website visits with Facebook accounts and track their actions.
Even if you plan to do retargeting by uploading your existing customer lists on Facebook, you still need to have the pixel code installed to measure the effectiveness of your campaigns.
3. Configure pixel events (conversion tracking)
After adding the pixel code to your site the next step is to configure events. Events are actions performed by users that you want Facebook to know about.
For example, adding a product to the shopping cart, clicking a button, signing up for your newsletter, or making a purchase from your store.
By default, when you add the Facebook pixel to your website, Facebook will be able to track which pages a user visited (PageView). To add other events, you need to configure them in Facebook Events Manager.
Login to your Facebook Business Manager or Ads Manager and click “Events Manager” from the top left menu.
Facebook will show you which events are currently being tracked. To add new events, click the “Add Events” button and select one of the available options.
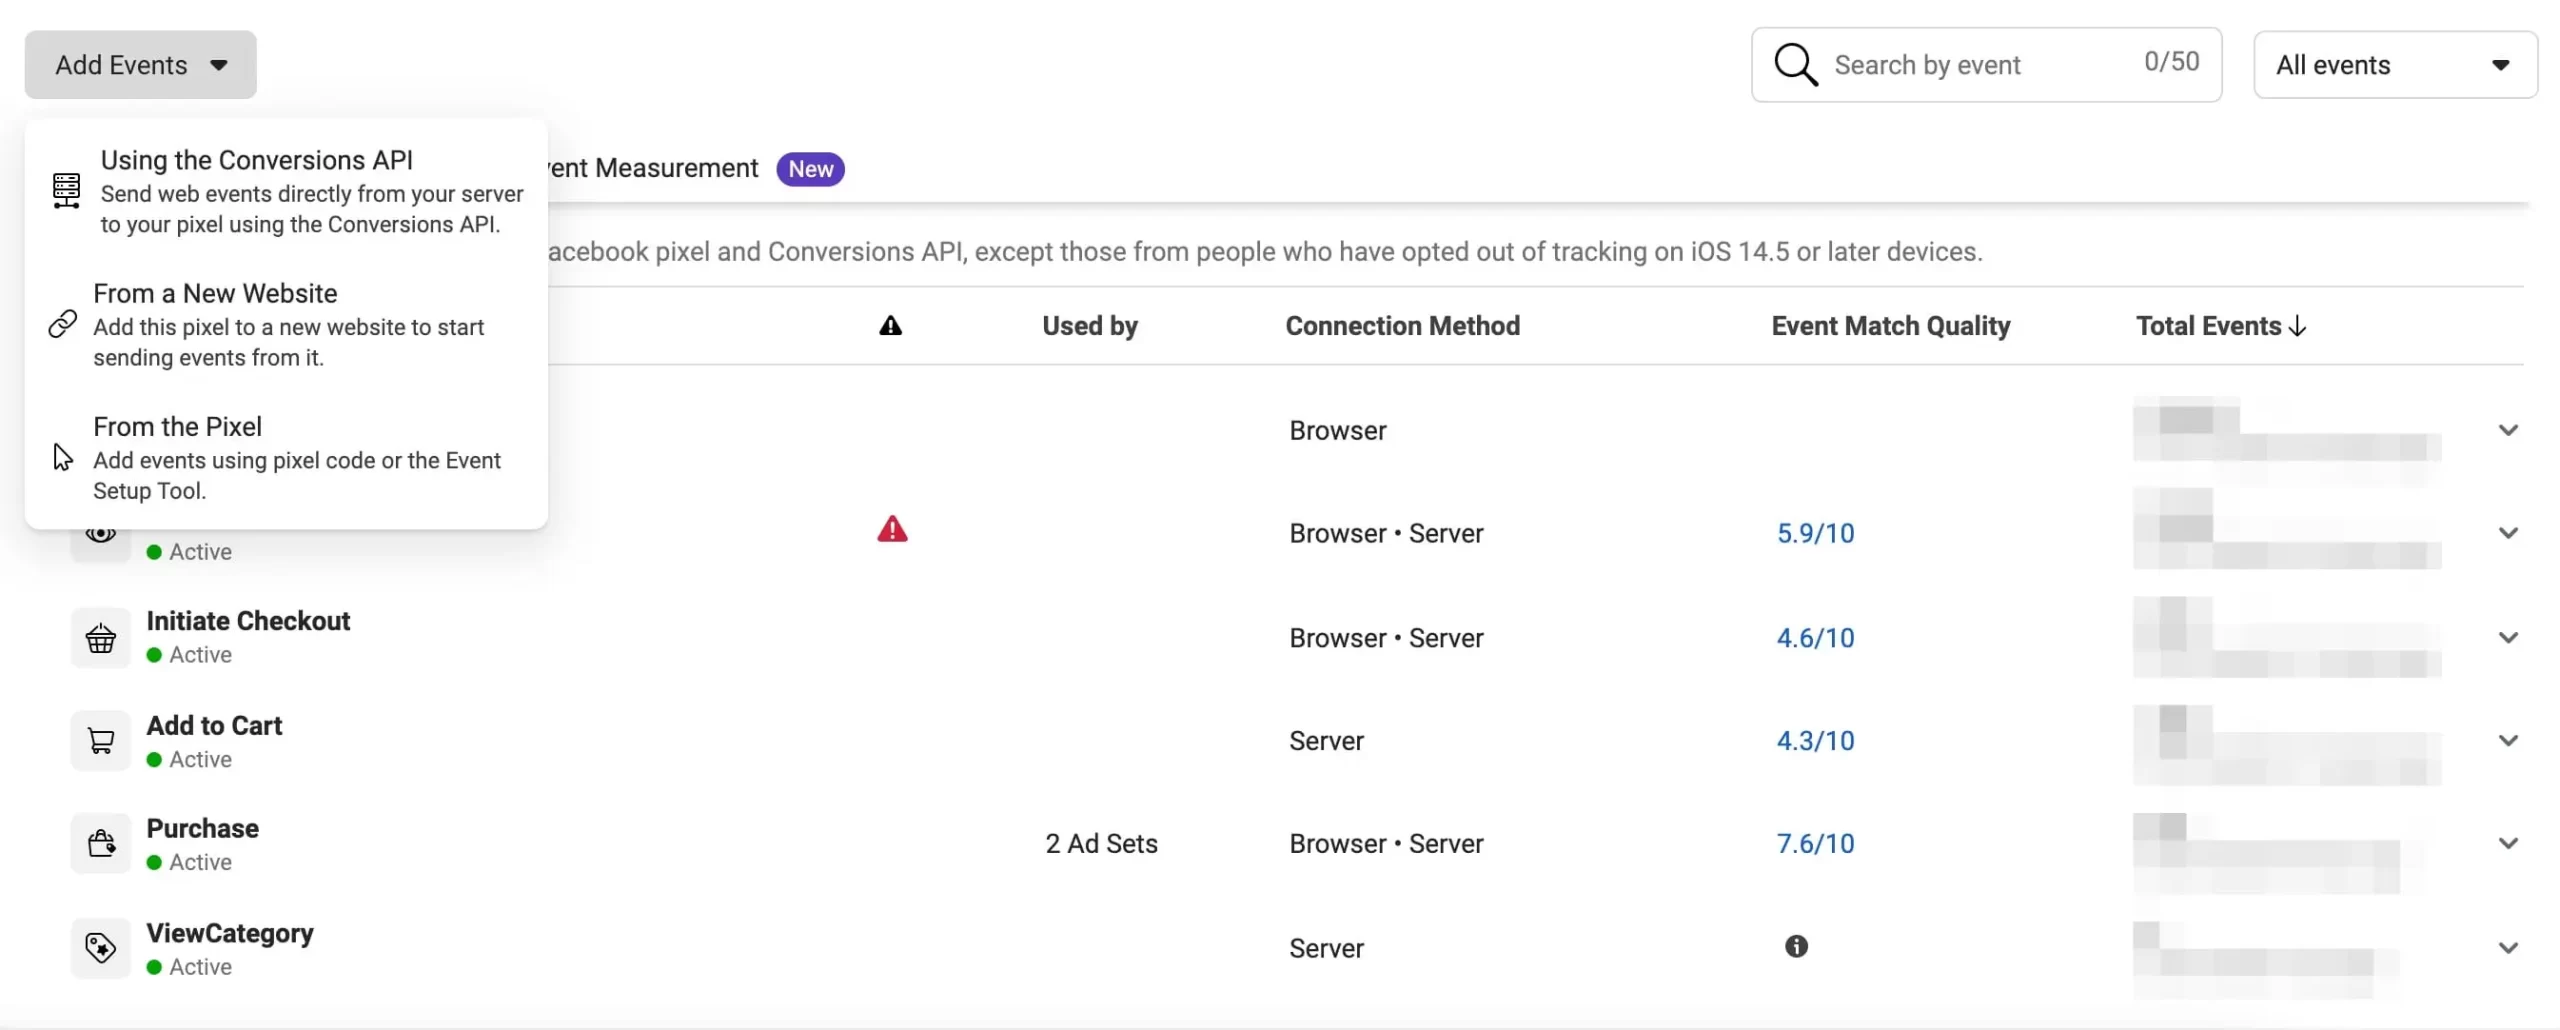
What kind of events do you need to configure?
This depends on your Facebook remarketing strategy and what you consider as a conversion.
For example, if you have an eCommerce store then you need to create an event for the “Add to Cart” and “Purchase”.
If your goal is to get leads through a contact form, then you need to configure an event to fire when the user submits the form.
For more information on how to set up Facebook pixel events, go through the following resources:
It’s important not to skip this step. Event tracking is essential for campaign monitoring and optimization. Facebook AI algorithms use data from events to optimize the performance of a campaign and get more conversions at a lower cost.
4. Create custom audiences
The next step is to create custom audiences. In simple terms, custom audiences are groups of people you want to target with your ads. As explained before, you can create an audience using your contacts, website traffic, or mobile app.
Follow these steps to define your retargeting audiences:
Login to your Facebook Business Manager or Ads Manager and select “Audience” from the top left menu.
Click the “Create Audience” button and select “Custom Audience”.
Facebook will prompt you with options to choose your custom audience source.
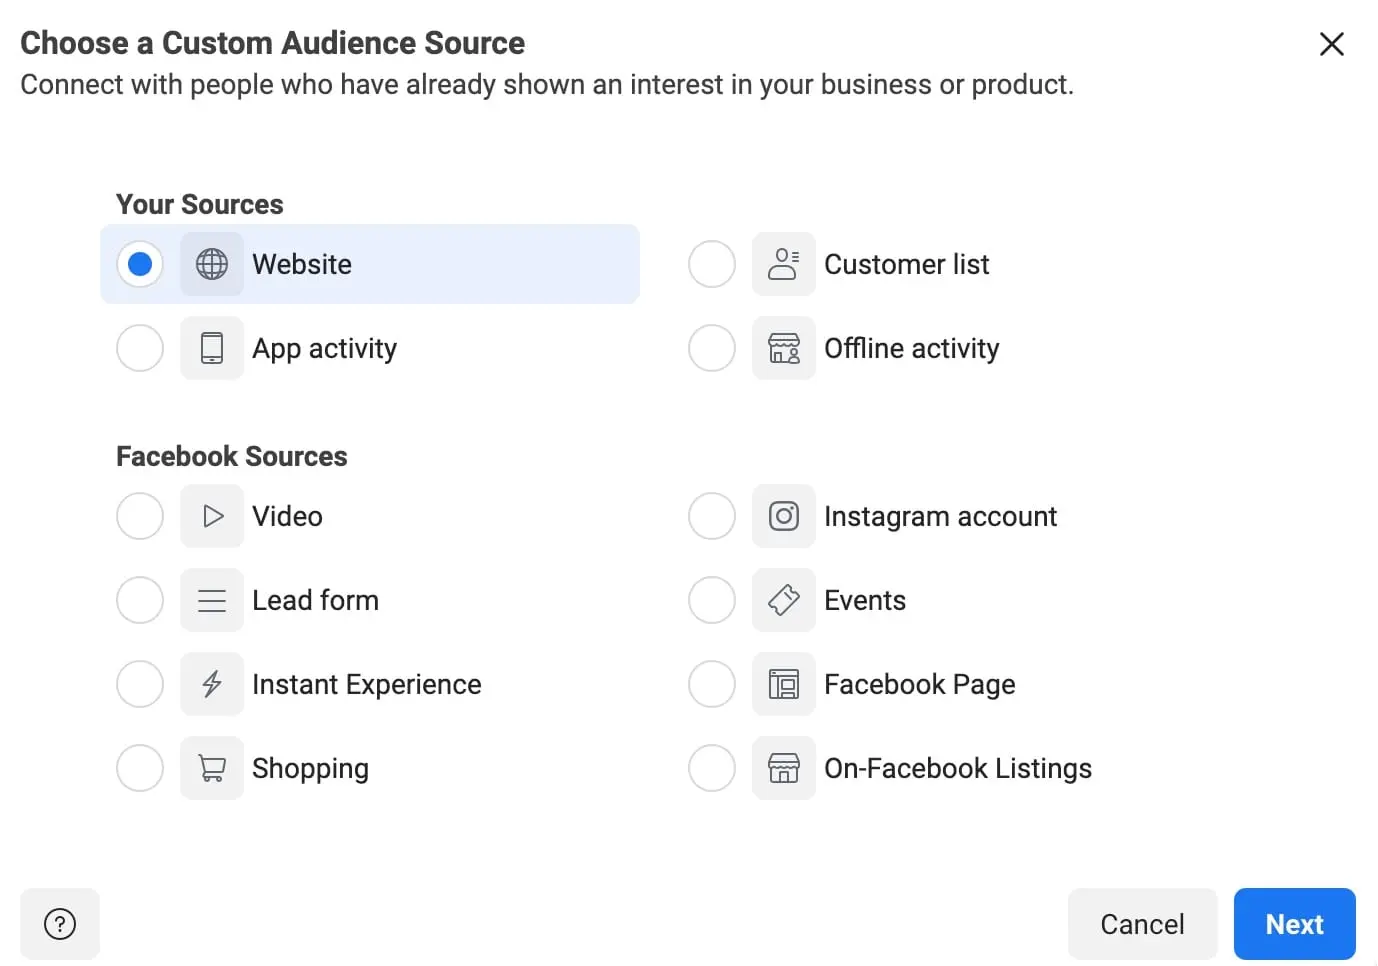
For the purpose of this tutorial, we’ll use the “Website” as the audience source. Depending on your business type, you can create an audience based on a different source.
It’s important to note that you can use multiple custom audiences on a single retargeting campaign. For example, you can combine both customer lists and website visits in one campaign.
So, for now, select “Website” and click “Next”.
In the next screen, you can define the rules for your custom audience.
Let’s examine what each rule does and when to use it.
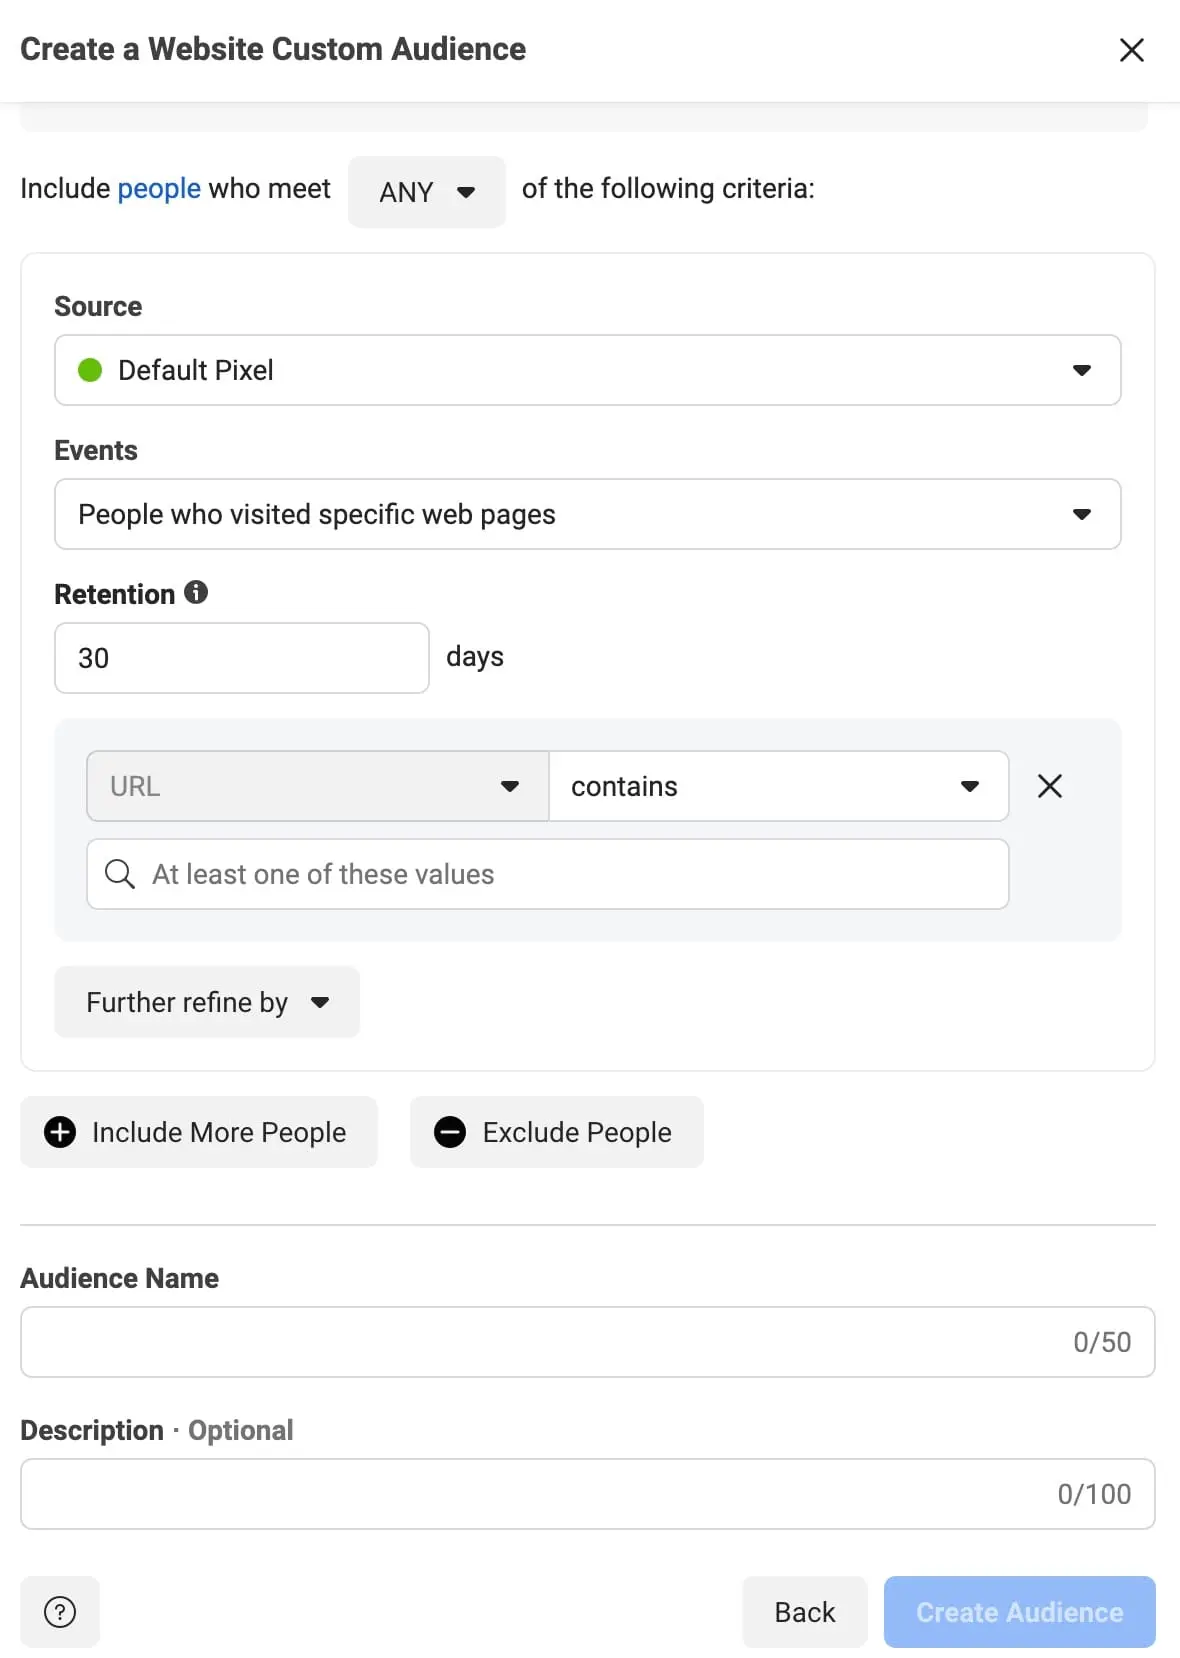
Source: Select a Facebook pixel to use for this audience.
Events: In this part, you can select people to include in your audience.
When you click the “EVENTS” dropdown, you have four options:
- All website visitors
- People who visited specific web pages
- Visitors by time spent
- From your events
All website visitors
This rule includes everyone who visits the website your pixel is installed on. It can be modified by the number of days (retention) you want FB to go back to add visitors (up to 180 days).
People who visited specific web pages
This rule includes people who visit specific pages on your website.
The available URL conditions are:

Contains – Here’s an example of how you could use this: If you sell clothes on your website and want to create an audience of people who’ve looked at summer clothes, you could have it be made up of people who visited URLs that contain “summer.”
Doesn’t contain – Here’s an example of how you could use this: If you sell tables, chairs, and drawers on your website and want to target people who’ve visited your tables and chairs pages, you could create an audience made up of people who visited URLs on your website that don’t contain “drawers.”
Equals – Here’s an example of how you could use this: If you want to target ads to people who have visited a specific web page (maybe one that indicates strong intent to purchase like the confirmation page for signing up for product update emails), you could create an audience of people who’ve visited that specific URL.
When you select the People who visited specific web pages option, you can further refine any of these URL rules sections by clicking Further refine by and adding:
- A Frequency rule lets you specify the number of times that someone should visit your website for inclusion/exclusion.
- A Device rule lets you specify what type of device someone has to visit your website for inclusion/exclusion.
Visitors by time spent
You can create an audience of your top 5%, 10%, or 25% visitors in terms of time spent on your website. The higher the value the more likely these people will engage with one of your retargeting ads.
You can use this rule in combination with specific web pages and retention periods.
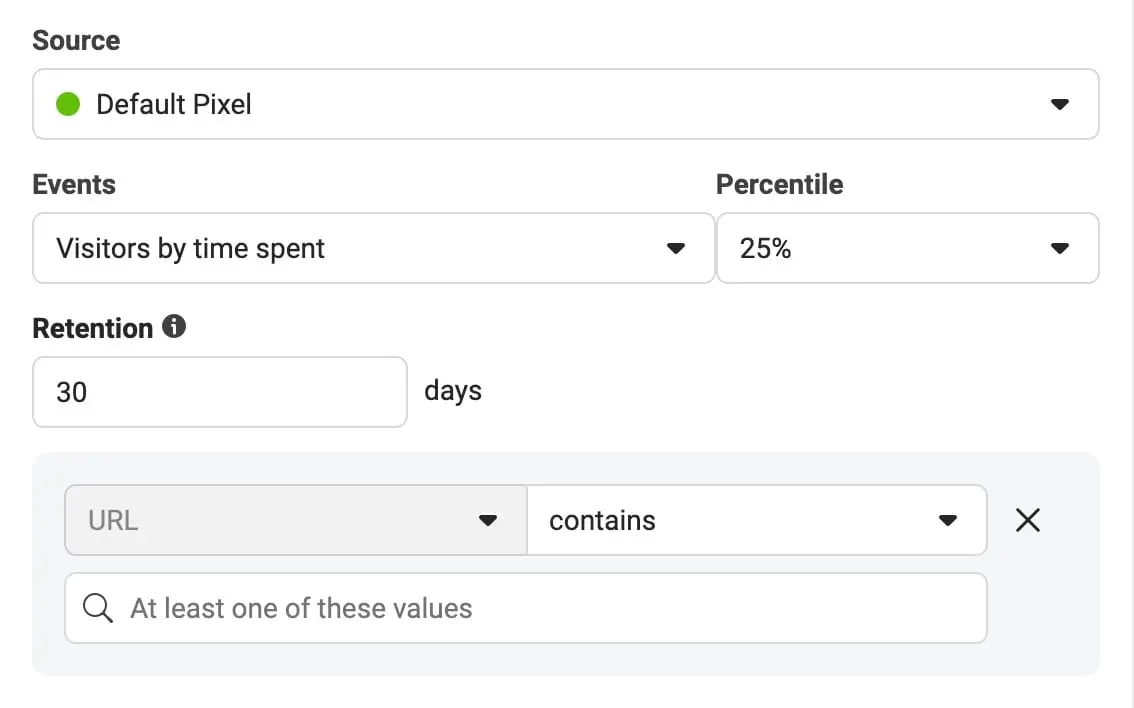
For example, you can create an audience of people in the 25% percentile who visited your sales page in the last 30 days.
From your events
You can use an event as the source of your custom audience.
As a reminder, events (configured in Step 3) are specific actions on your website that Facebook pixel can track such as viewing a particular page (PageView), adding an item to the shopping cart (AddToCart), or completing a purchase (Purchase).
What custom audiences to create?
The type of audiences to create depends on your Facebook retargeting strategy.
In this tutorial, our goal is to show ads to people that visited our website in the past 90 days but did not make a purchase.
So, to make this happen we need to create two audiences:
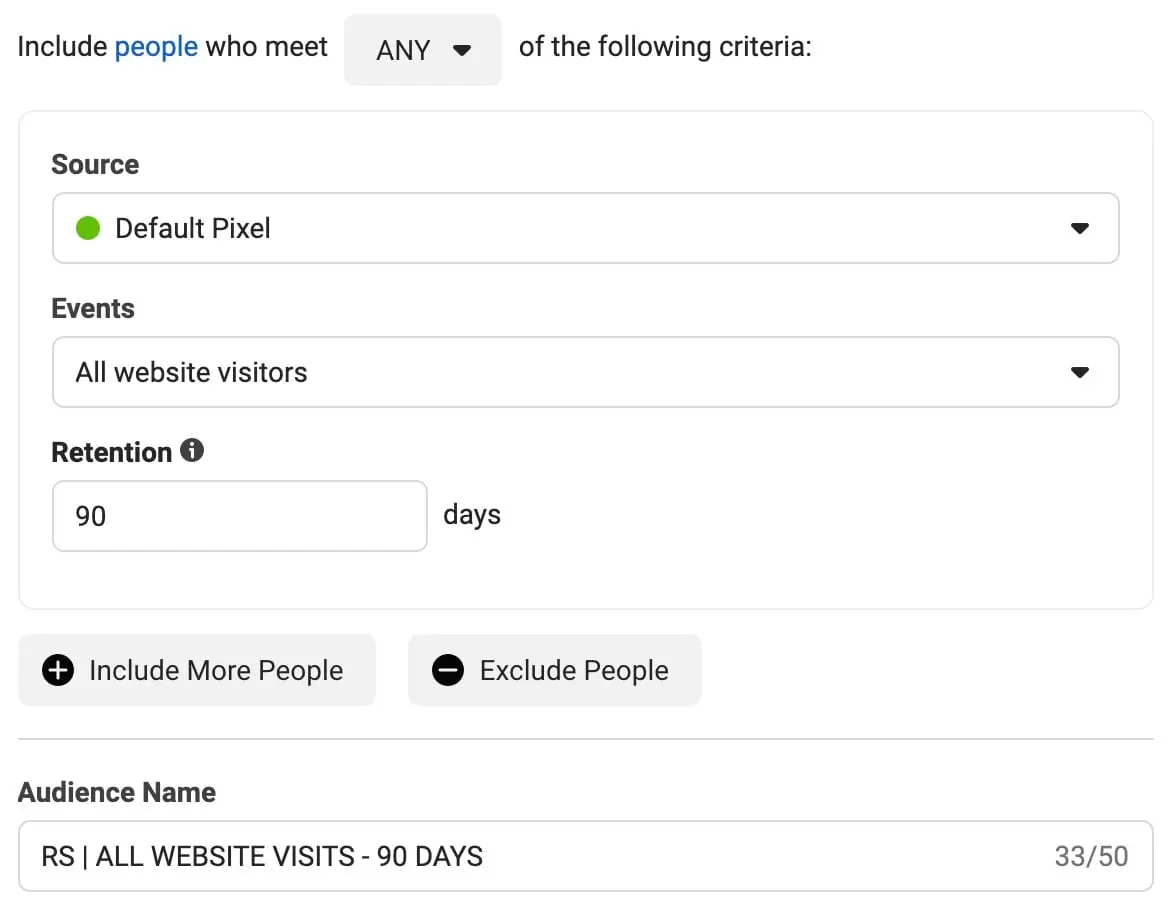
1. The “All Website Visits – 90 Days” – this audience will include people that visited any page on our website for the last 90 days. This is how the rules for this audience look:
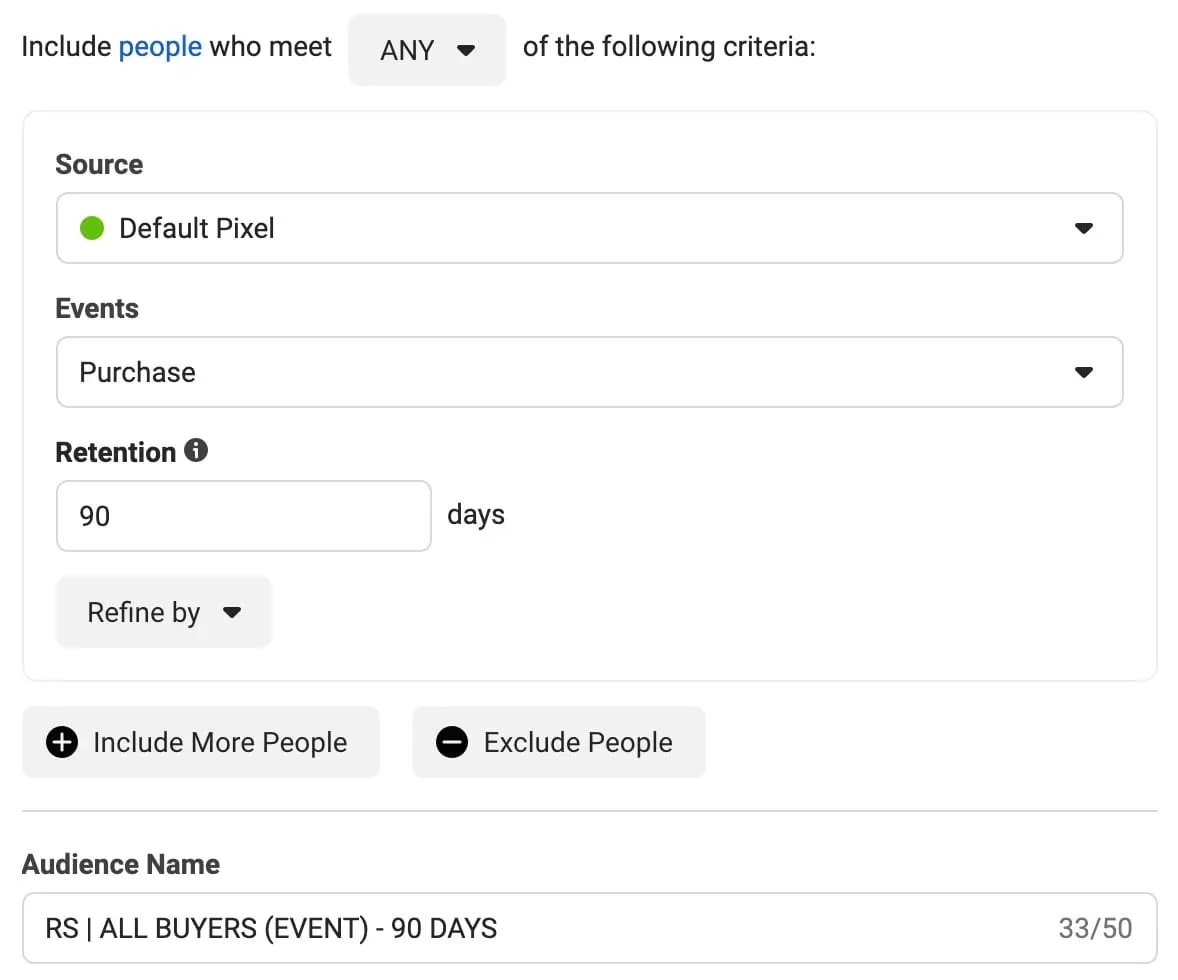
2. The “All Buyers (Event) – 90 Days” – this audience will include all people that purchased a product from our website for the last 90 days. This is how the rules for this audience look:
5. Create a Facebook remarketing campaign
After creating your custom audiences, the next step is to set up your remarketing campaigns on Facebook.
Follow these steps:
Go to Facebook Ads Manager.
Click the “+ Create” button to create a new campaign.
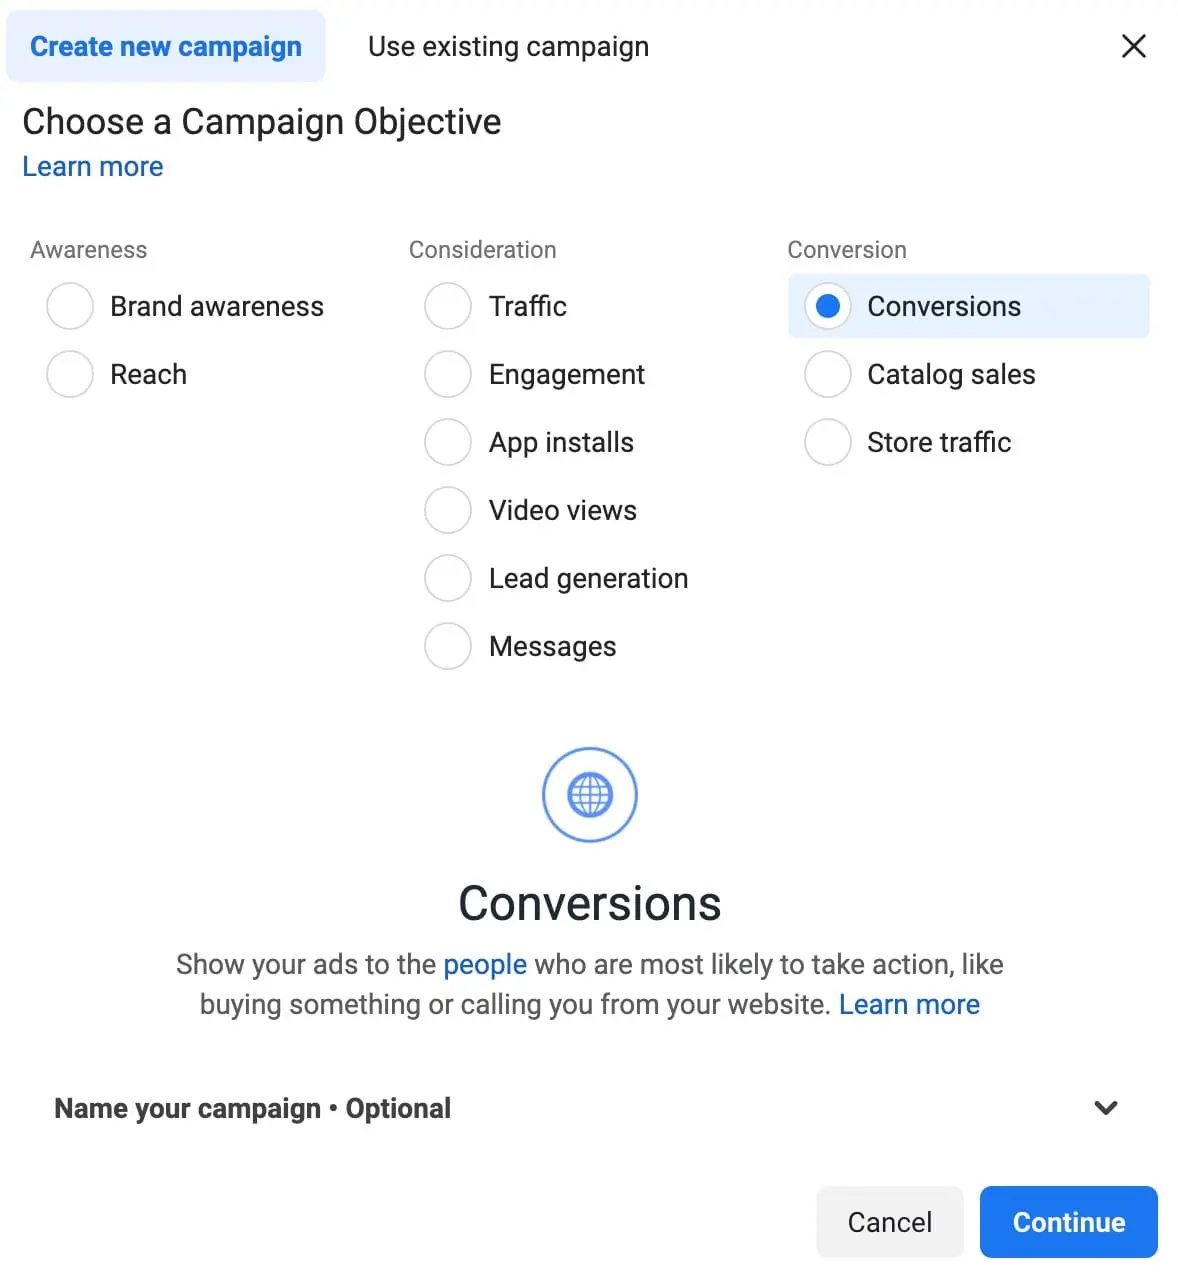
Select “Conversions” as the campaign objective and click “Continue”.
Click on the “Campaign” option to provide a name for your campaign and set your daily budget.
Click on the “Adset” option and configure the following settings:
Conversion Event: Make sure that this is set to “Purchase” or any other event that has a monetary value.
Audience: This is the part to define who you want to see your ads. We’ll use the audiences created in Step 4.
Click the “Search existing audiences” box and select the “All Website Visits – 90 Days” audience.
Click the “Exclude” button and select the “All Buyers (Event) – 90 Days” audience.
Your screen should look similar to this:
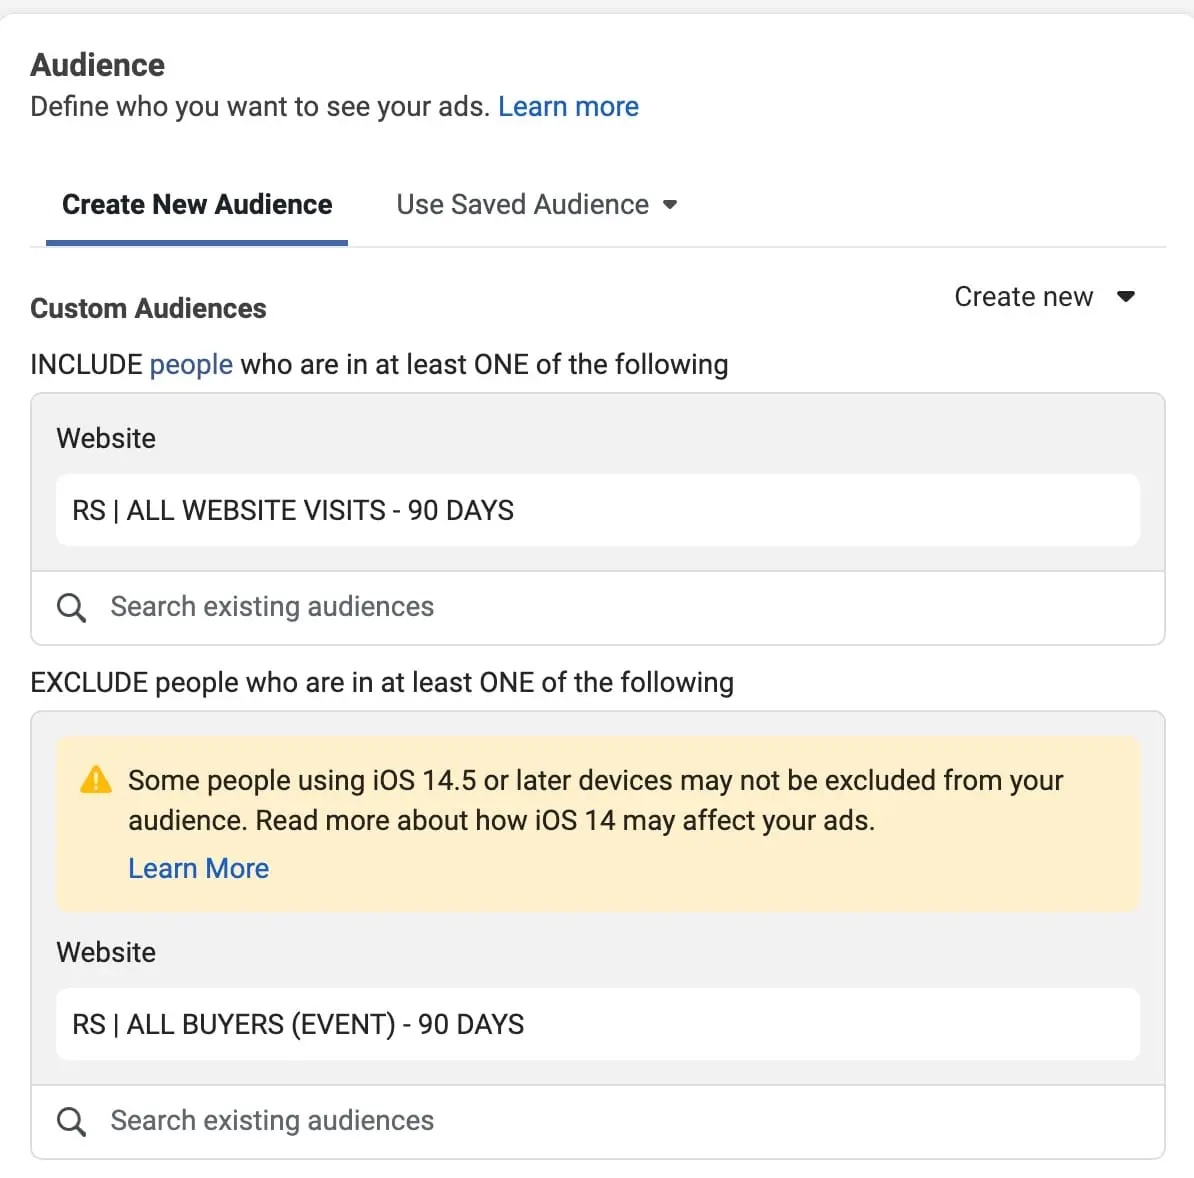
The reason we are excluding the “All Buyers – 90 Days” audience is to show our retargeting ads to people that have not yet completed a purchase. There is no reason to retarget people that already converted.
Locations: Only set a specific location if you’re targeting people living in a specific country or region. If you’re operating globally, do not set a location.
Leave the rest of the options in their default values and proceed to the next step to create your ads.
6. Create remarketing ads
The final step before starting your Facebook retargeting campaigns is to create your ads.
Ad creation is an important step because if your ads are not interesting enough, you won’t get enough clicks and this minimizes your chances of running profitable Facebook campaigns.
Facebook Remarketing Ads Tips
While I cannot tell you exactly what to show in your ads (this depends on the type of products or services you want to promote), I will give you some tips to make your ads more effective.
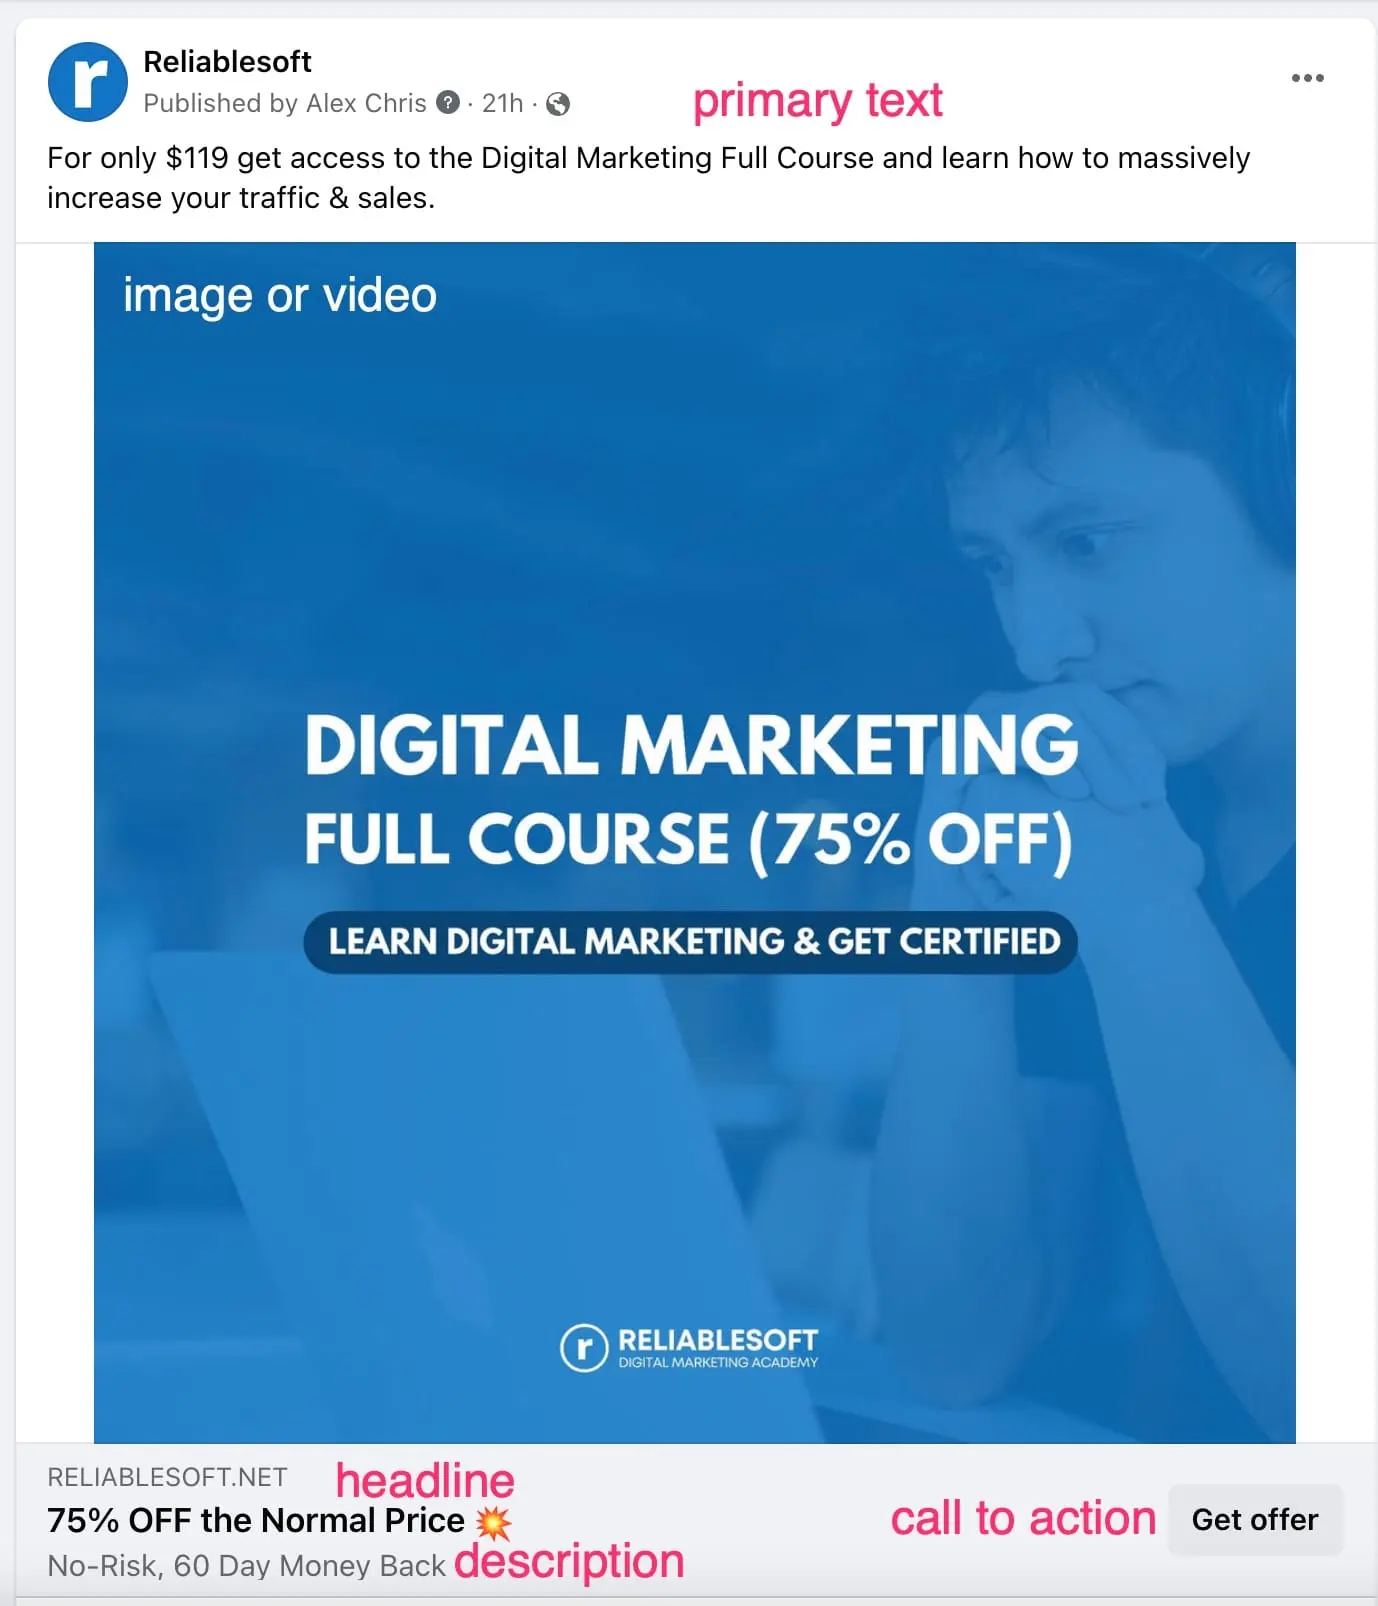
Provide multiple options for primary text: The primary text is shown on the top of your ad. Add a couple of lines and use the preview option to make sure that the important text is shown on the ad without breaks.
Use the “Add Options” button to provide up to 5 different primary texts for the same ad. Facebook will perform tests and choose the best-performing option.
Keep your headlines short: Use headlines to highlight the benefits of your offering. Use the “Add Options” button to provide for a couple of different headlines.
Provide an ad description: This is optional but recommended. The description is shown below the headline. Add no more than a line of text.
This is how the different ad elements appear on Facebook Ads.
Remind users about the benefits of your product or service: When creating the visuals for your ads concentrate more on your product’s advantages and benefits from the purchase like ‘XX Money Back Guarantee,’ ‘Free Updates,’ ‘Lifetime Access, ‘ Personal Support,’ etc.
Create at least 3 ads per ad set: For each adset try to have AT LEAST three active ads at any given time. This will help Facebook optimize the campaigns around the ads that perform better, and users will not see the same ads in their Feed.
Have at least one image ad per ad set: While Video ads (or ads with movement) tend to perform better, it’s recommended to have an image ad active all the time. This will ‘help’ the Facebook algorithm show your ads in cases video ads are not shown (for example, to users on a slow internet connection).
Use 10-second video ads: We found out that 10-second video ads are more efficient than longer videos. You can use Facebook’s Video creation tool (you can find this in the AD CREATIVE section when editing Ads) to easily create ads with movement using one of their ready-made templates.
Preview your ads using the Preview tool: Before publishing an ad, make sure that you check how it will look on all placements using the Preview Tool. This is important if you have more than one placement enabled. Different placements show images/videos and text differently, and you should check and fix any issues,
You can view this guide from Facebook for the specific specs per ad placement.
Use the Facebook Ad Library to Get Ideas: The Facebook Ad Library allows you to search all ads currently running on Facebook and Instagram.
You can use it to spy on your competitors and get ideas for your ads.
- Visit the Facebook Ad Library
- Search for a company name or keyword
- Click on an ad to view more details.
Once you get to this point, you’re ready to start your first Facebook retargeting campaign. Click the “Publish” button to finalize your changes and move on to the next step.
7. Monitor the performance of your remarketing ads
There are two ways to monitor the performance of your Facebook campaigns. The first one is to use the data provided in the Facebook Ads Manager, and the second one is to use the Ads Reporting feature.
With Ads Reporting, you can create detailed reports analyzing how your campaigns perform, export the data into other formats, and share the reports with your team.
For the purpose of this tutorial, we will focus on monitoring your campaigns using the Ad Manager, which is the most commonly used tool. Once you know what to monitor, you can easily create a report with Ads reporting.
Important campaign metrics to track
As stated above, the objective of our retargeting campaign is to increase conversions (purchases). So, when monitoring the ads’ performance, we should concentrate on metrics related to conversions (such as Add to Cart, Checkout, Purchase).
Of course, besides conversions, you should also monitor other key metrics like Cost Per Click, CTR (Click-through rate), and other KPIs that can give you a more accurate picture of how your campaigns are performing.
Let’s see how to do this in Ad Manager.
Click the “Columns” dropdown and then select “Customize Columns”.
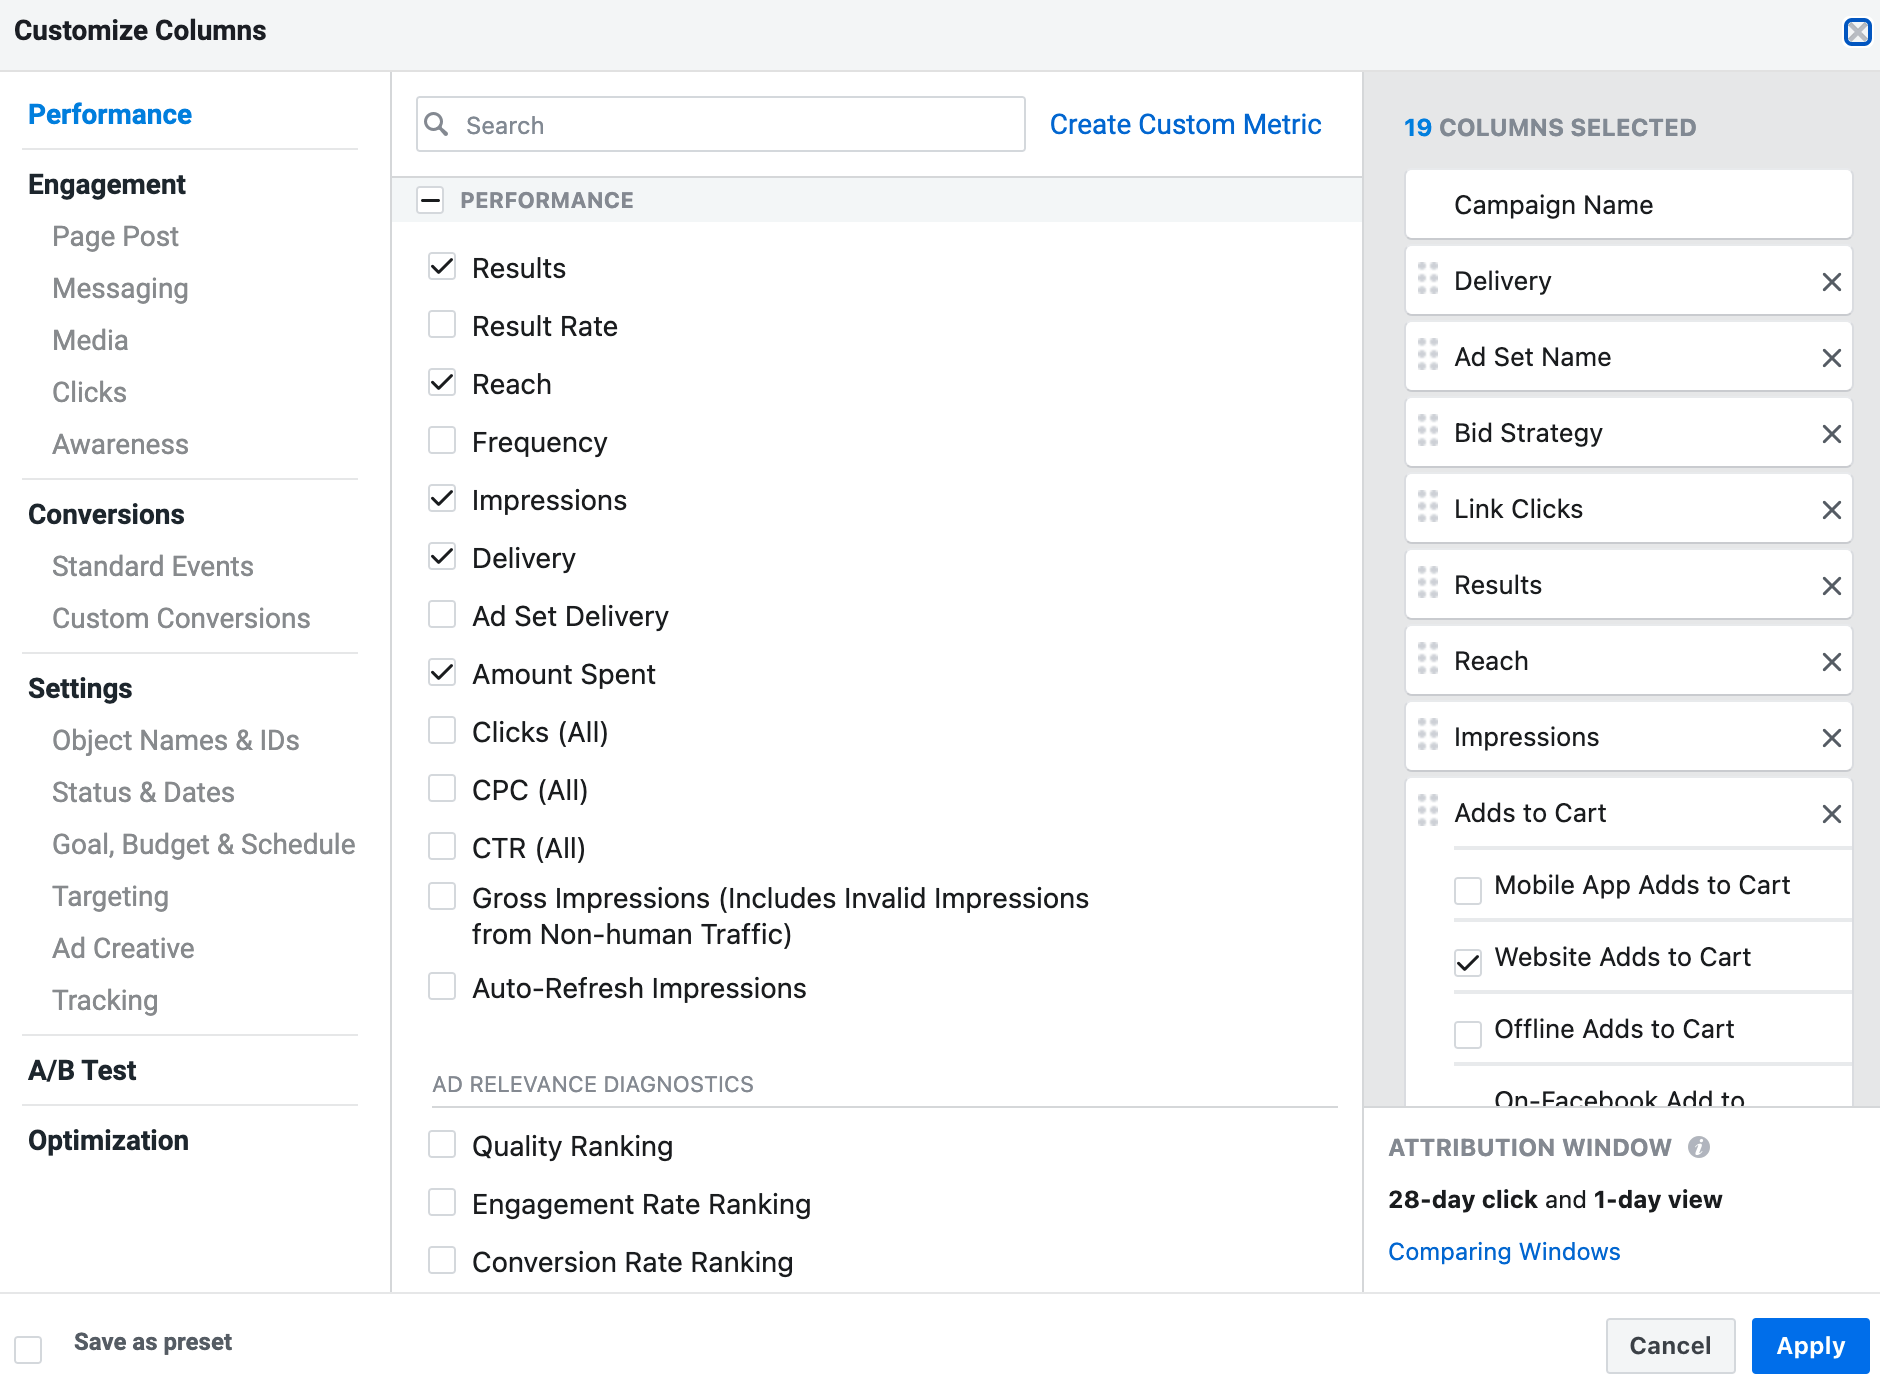
You see on the left a categorization of all available metrics you can use in your report. In the middle, you can select which ones to include, and on the right, you can set the order in which the different metrics will appear.
Go through the list and add the following columns to your report:
Campaign Delivery – shows you the current status of your campaign (active, pending, inactive, etc.)
Results –the total number of conversions generated. This is based on your conversion setting. If you have set the conversion to ‘Purchase,’ then the Results column shows the total number of purchases generated by the particular campaign.
Cost per Result – The average cost per result. This is equal to the total amount spent on the campaign/number of results.
Amount Spent – The total amount spent for the particular time for the selected time period.
Reach – The number of people who saw your ads at least once.
Impressions – The number of times your ads were on screen.
Link Clicks – The number of clicks on links within the ad that led to advertiser-specified destinations, on or off Facebook.
CPC (Cost per Link Click) – The average cost for each link click. The metric is calculated as the total amount spent divided by link clicks.
CTR (All) – The percentage of times people saw your ad and performed a click.
Adds to Cart – The number of add to cart events attributed to your ads.
Checkouts Initiated – The number of initiated checkout events attributed to your ads.
Cost per Add to Cart – The average cost of each add to cart. This metric is calculated as the total amount spent divided by add-to-cart events.
Purchases – The number of purchase events attributed to your ads.
Purchases Conversion Value – The total value of purchases tracked with the conversions objective.
Cost per Purchase – The average cost of each purchase. This metric is calculated as the total amount spent divided by purchases.
When you’re done and BEFORE closing the window, click the “Save as Preset” button in the bottom left corner and provide a name for your column set. Click “Apply” to close the window and save your configuration.
Click the “Columns” dropdown again and select “Set as Default”. This will make your custom column set the default option so that you don’t have to perform the same steps every time you visit the Ads manager.
Facebook Retargeting Best Practices
Now that you have the most important metrics in front of you, let’s see how to use this data to improve your campaigns’ performance.
1. Give campaigns enough time to run before making a decision
The first tip for you is not to rush into making conclusions too soon. Give your campaigns enough time (a reasonable period is two weeks) before making any changes.
The same goes when making a change to a campaign. Wait for at least two weeks before keeping your last changes or making new changes.
2. Analyze each ad separately
The next tip is to go deeper into each campaign and analyze it in detail. Don’t just look at the general picture but click the Campaign name to see your ad sets and individual ads’ performance.
Before you do this, make sure that you clearly understand what each metric means, as explained in the previous step.
3. Start with the Reach and Impressions
Two of the metrics to look at are reach and impressions. If the numbers are small or not increasing as the campaigns run, then it means you need to revise your Audience and targeting options to include a bigger audience to target.
For retargeting campaigns to work, you need to have a decent audience size. While there is no minimum, the larger your audience is the better. If needed try to extend the retention period of your audience to the maximum (180 days) to include more people.
4. Look at Link Clicks, CPC, and CTR
If there are no issues with your reach and your ads are shown to Facebook users, then the next metric to check is Link clicks and examine the Cost Per Link Click and the Link Click-Through Rate.
This group of metrics will tell you what percentage of people who saw your ads clicked on them and the amount you paid for each click.
The best way to do this is to click the Campaign and then an ad set to get to the Ads view. Examine these metrics for each individual ad.
On average, a CTR of 2% and up is considered good. If all of your ads are under this value, consider replacing them with new ads with a different theme.
Examine which ones perform better than others and create new ads with the same concepts.
For example, if you have an image ad performing well, try to create a video ad using the same theme and messaging. Keep both ads running and compare the results.
5. Examine the Cost Per Purchase Metric
The cost per purchase shows you how much you pay Facebook per purchase generated through your retargeting campaigns, and it’s perhaps the most important metric to follow.
Your cost per purchase should be low enough so that you profit for each purchase, after taking into account other costs (such as product costs, delivery, etc.).
If you sell products at different prices, use the Purchase Conversion Value and the cost per purchase to understand the cost of making a sale for different products.
At the end of the day, your goal is to lower the cost per purchase so that you can generate more sales from your FB budget.
Conclusion
Retargeting is one of the best ways to increase conversions and Facebook retargeting ads is one of the most effective tools to do that.
All businesses should try Facebook retargeting. As explained above, the process is easy and to set up and works for all kinds of businesses and products.


Leave a Reply