This step by step guide will show you how to migrate your WordPress website from http to https without losing your rankings or SEO.
To go through the process successfully you will need an SSL certificate and FTP access to your website.
Before we get into the technical details, let us first examine what do we mean by ‘migrate your website to https’, why it is important to do so and what is the relationship between https and Google rankings.
What is https and SSL Certificate?
Let’s start with the basics:
What is an SSL Certificate? SSL stands for Secure Socket Layer. It is a security protocol that enforces encrypted communication between the web browser and the web server.
This means that any information that is transmitted between your website and web server like usernames and passwords, credit card information and any other data submitted by users, is secure and encrypted.
If an SSL is not present, the information is submitted in plain text.
What is the problem with that? If a hacker manages to intercept the connection between your website and server, can get access to the information.
What is https? Websites that have an SSL certificate installed and configured can be accessed using https://www.example.com instead of the traditional non-secure way of http://www.example.com.
Modern browsers, label https websites with the word secure as shown below.
When a website is using an extended validation SSL (EV-SSL), their company name is shown in the browser green bar as in the example below.
To get an EV-SSL, the certificate issuing company needs to verify your organization details (like company address, registration id) to ensure that the particular website is the official representative of that company.
Is https a ranking signal?
Https is not something new, it’s been around for years but it was until 2014 that Google decided to start an initiative to make the web more secure and introduced the slogan “https everywhere”.
They started by making all google searches https and also announced that https websites would gain a very small ranking boost.
You can read below the related paragraph from their 2014 announcement in Google webmaster central blog.
When Google says a lightweight signal, it means that other things being equal, a webpage that is https will rank above a webpage that is non-https.
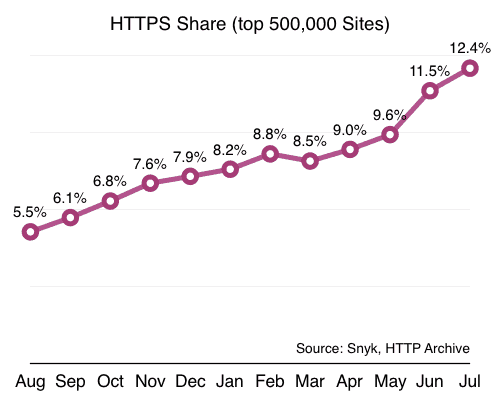
The adoption of https is still low but recent studies show that the percentage of https websites in increasing steadily.
Despite the low adoption, Google in several occasions encourages webmasters to migrate their websites to https.
Note: Https is a page ranking factor and not a website ranking factor. This means pages that are https will take advantage of this benefit even if the website as a whole is not https.
Should you migrate your website to https?
This is definitely something you need to do now or in the near future.
Sooner or later, https will gain more importance as a ranking signal and everyone will rush into making their websites https, so the faster you do the migration the better.
In addition, https is something that increases user’s trust so if you have an eCommerce website it is a must and not something optional.
How to Move a WordPress Website from http to https
Here are the steps on how to move your WordPress website from https to https.
Step 1: Install an SSL Certificate to your server
The first step is to purchase and install an SSL certificate on your web server. Google states that you can use any modern SSL certificate as long as it supports 2048-bit key encryption.
The cost of a normal certificate is approx $50 per year and can be issued instantly by the provider.
The best way to get past this step is to contact your web hosting provider and ask them to install an SSL certificate on your server.
Most web hosting providers have options in their account dashboards (or cpanel), where you can purchase an SSL.
Once they install the SSL, you can check that it’s working ok by navigating to your website using https.
Step 2: Change WordPress Default URL
The second step is to login to your WordPress dashboard and locate the GENERAL option, which is located under the SETTINGS menu.
Make sure that both your WordPress Address (URL) and Site Address (URL) start with https.
Once you click the SAVE CHANGES button (located at the bottom of the screen), you will be locked out of WordPress and you will have to login again.
Step 3: Add 301 Redirects to Redirect http requests to https
So far, you have installed an SSL certificate on the server and changed the default WordPress URL to be https.
This is not the end of the process. In order to gain the SEO advantage from https, your website needs to be configured to redirect http requests to https requests.
In other words, the default URL for all your posts should start with https and not http.
The easiest way to do this is to add the code below to your .htaccess file (you will need to access and edit the file using FTP).
Hint: If you don’t know how to EDIT the .HTACCESS file via FTP, refer to Chapter 8 of the Complete SEO Guide
What this code does is to redirect (using permanent redirect – 301), all http request made to your webserver to the equivalent https page. This way you don’t have to create a page by page mapping.
# HTTPS redirect

<IfModule mod_rewrite.c>

RewriteEngine On

RewriteCond %{HTTPS} off

RewriteCond %{HTTP_USER_AGENT} !FeedBurner    [NC]

RewriteCond %{HTTP_USER_AGENT} !FeedValidator [NC]

RewriteRule (.*) https://%{HTTP_HOST}/$1 [R=301,L]

</IfModule>
Notice in the above code that feedburner is excluded from https. This is needed if you are using feedburner to generate your RSS. If you are not using feedburner you can exclude those 2 lines (Feedburner and FeedValidator).
Once you save your .htaccess file, open a browser window and perform a few tests.
First, try to access any http URL and make sure that it successfully redirects to the equivalent https URL.
Second, try different combinations i.e. http://www.sampleurl.com and http://sampleurl.com and make sure that both redirect to the correct https URL.
Step 4: Use Search and Replace
The next step is to correct any internal links that you have in your content to point to the https version.
For example, if you have internal links in your content that start with http, you will have to change them to point to https, otherwise this will create mixed content warnings and the browser will not show your website as secure.
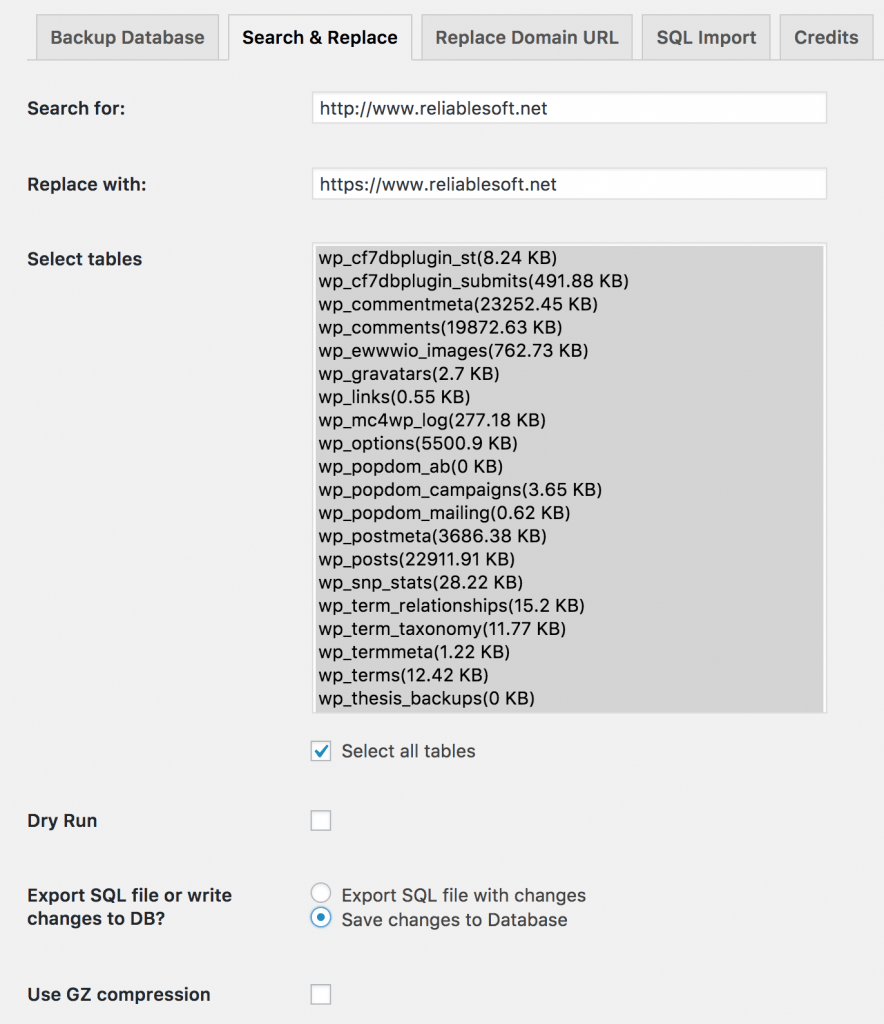
The best way to do this is to use a plugin. Install and active the search and replace plugin (it’s free).
Then go to TOOLS and select SEARCH & REPLACE.
Note: Before running a search and replace on your website, it is highly recommended to take a backup of your Database.
Click the SEARCH & REPLACE tab and adjust your settings as shown above (use your own domain in the SEARCH FOR and REPLACE WITH input boxes.
When you click the DO SEARCH AND REPLACE button, the plugin will change all URLS it can find in the database from http to https.
Step 5: Check for non-https links
The next step is to check for any external links you have in the content and make sure that start with https and not http.
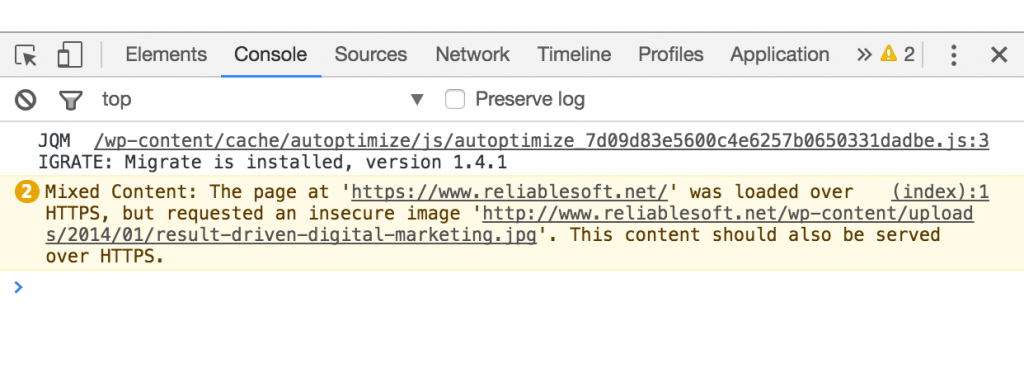
You can do this by navigating to your website’s pages. If the browser bar shows that the page is not secure (like the example below), find the link that is not secure and change it to https.
There are 2 ways to find these links.
First, is to use Chrome’s developer tools. Right click anywhere on the page and select INSPECT. This will open the developer tools.
Click the CONSOLE tab to find the URL that is causing the issue. Edit your content and change the URL to https.
Second, check your website using this free service. It will crawl your pages and give you a report on the links that need to be changed.
Step 6: Check for broken links
If you followed the above steps successfully, then most probably your website should be fully https with no mixed content warnings and you won’t have to do anything else.
As an extra measure, you can check and ensure that you don’t have any broken links (either http or https).
You can use this free tool by Xenu to get a report of the links that need to be fixed.
Step 7: Add your https website to Google Search Console
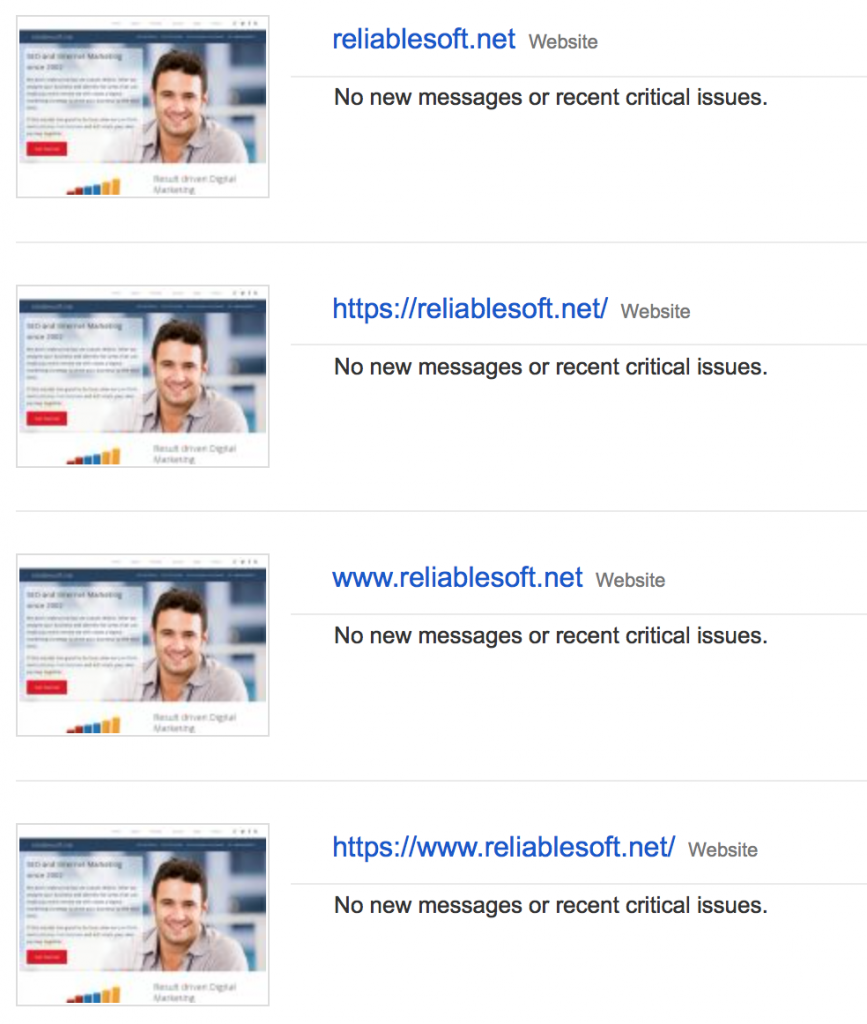
To maintain your current Google rankings and to officially inform Google that your website is now https, you need to add the https variations to your Google search console.
This is the same procedure as before (if you haven’t done this already for your http versions, see Chapter 2 of the Complete SEO Guide).
So, at the end of the process you will have 4 website variations registered in the Google Search Console (as shown below).
Note: It is necessary to keep both the http and https versions in your Google search Console since Google considers these to be 4 ‘different’ websites.
Repeat the same procedure and submit your https websites to Bing Webmaster tools as well.
Step 8: Re-generate your XML sitemap and submit to Google
While managing your websites in Google search console, it’s also recommended to re-generate your XML sitemap and make sure that all links are now https and re-submit it to Google.
This guide ‘How to optimize your XML sitemap for maximum SEO’, will give you all the details.
Step 9: Check Robots.txt
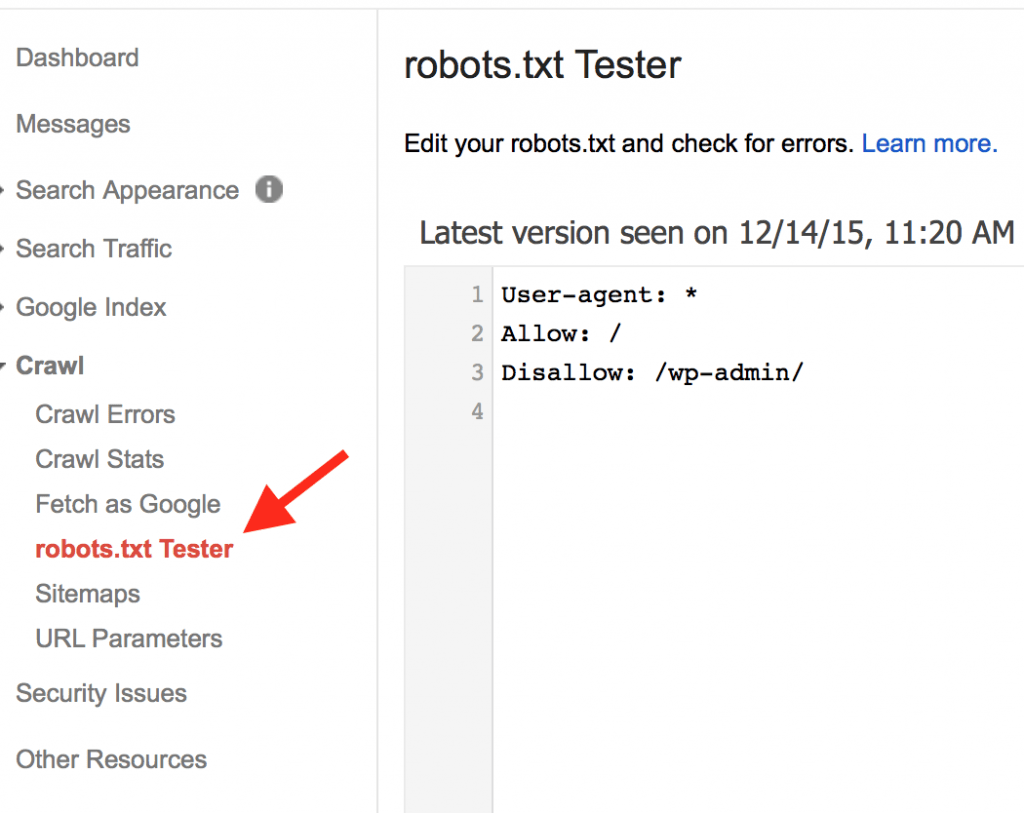
Another check to make is to ensure that your ROBOTS.TXT file is not accidentally blocking search engines from accessing your https website.
Login to the Google Search Console and select ROBOTS.TXT TESTER (under Crawl). Click the TEST button and make sure that you get a GREEN bar with the word ALLOWED.
This means that Google can successfully access your website without any blockings.
Step 10: Submit your https website to Google
The next and final step is to submit your new website to Google.
Although we resubmitted the XML sitemap and Google will know about the change in URLS, to speed up the process you can go to FEATH AS GOOGLE (under Crawl), click FETCH AND RENDER.
Check for any errors by clicking the PARTIAL link and if everything is ok, click SUBMIT TO INDEX and choose the option to SUBMIT ALL URLS.
Step 11: Change incoming links from http to https
The process in now complete. Your website is configured to redirect any http requests to the equivalent HTTPS, you have fixed any mixed content warnings, your sitemap is updated and the website is submitted to Google.
If you want to help Google (and other search engines), update their index faster, you can go and edit all external links (that you can access) pointing to your website to https.
For example, you can go to Facebook, Twitter, Pinterest and other social networks that you added your website’s link and change it to https.
Don’t worry about the links you cannot change, the 301 redirections we added in the .htaccess file are responsible to inform search engine’s spiders that the links have changed to https.
Step 12: Monitor your rankings and traffic
The above procedure is straight forward and under normal conditions, your rankings will not be affected negatively.
Nevertheless, it’s always wise to monitor your traffic in Google Analytics and ranking positions (using your favorite keyword research tool), to pinpoint any issues and try to resolve them as fast as possible.
Will my rankings increase after migrating to https?
In all websites we migrated to https we saw a slight increase in rankings and traffic.
Remember that https is a low ranking factor (at least for now), so don’t expect huge differences.
Don’t forget that you are adding the secure certificate not only to benefit from the ranking boost but also to increase user’s trust, which can prove more beneficial in the long run.
Conclusion
Migrating your WordPress website from http to https is not difficult. The steps described above are all you need to do and for most websites the migration process takes only a couple of hours.
There is a cost involved since you will have to renew the SSL certificate every year, but for an online business who wants to stay in synch with the latest SEO developments and cares about data security, this is not an excuse of not migrating to https.
Have you migrated to https yet? Do you have a question that was not answered above? Let me know in the comments.






Great article. I just changed to https and these are really helpful tips!!!
Hi Kelly
Thanks for your comment. Hope your migration to https went well.
Alex
A very complete and through post that I really enjoyed and learned from.
Hi Sara
Glad that you found our guide useful!
All the best
Alex
Very informative and helpful. Thanks Alex for sharing. I was wondering, do you also have a guide with migrating from wordpress.com to worpress.org?
Hi Emmerey
The process is similar but not the same. Currently, I don’t have a guide for migrating from wordpress.com to wordpress.org but it’s a great idea for a new blog post.
Thanks
Alex
Thanks for the reply Alex. Would definitely check it out if you decide to write about it 🙂
Thanks, Alex it’s really awesome post you sharing us I have nothing any idea about https and HTTP but after reading your post I know that what is the difference in both.
Hey Alex,
Loved the post! I Defintely learned a few things.
Fortunately, I didn’t migrate my website yet. So now I can follow your instructions and know that I’m safe 🙂
Thanks very much,
Sariel
PS: Heading off to tweet it right now.
Hi Sariel
Thanks a lot. Good luck with your migration.
Alex
Hey Alex!
I was wondering which genesis child theme do you use.
I really love the design.
I mean I know it’s heavily customized. But it could actually give me a good head start.
Hi Rahul
I’m using a custom genesis theme. We created our theme from scratch based on the genesis framework.
Thanks
Alex
Just so you know you don’t actually have to pay for SSL certificates anymore – you can get them for free from Let’s Encrypt.
Hi Fred
That’s absolutely true. Let’s encrypt is now another option.
Thanks
Hello ! ,
Thanks for your information. But after migrate is there any effect on Adsense revenue? need to update with google Adsense code and google analytics code ?
Hi
No. Both Adsense and analytics should work without any issues.
Thanks
Hello! I have a question! If I will make my website secure with https, i will lose my rank? All my backlinks will work the same ?
Hi Andrei
Your rankings won’t be affected provided that you add the 301 Redirections as described in step 3.
Hope this helps
Alex
Thank you !!
Thanks a lot it helps me a lot to migrate my blog from http to https. please tell me about the backlinks which i created as http are these backlinks still useful for me?
Hi
Yes they are. The “301 Redirects” also tell search engines to update their links so eventually they will be credited to the https pages.
Thanks
With all the confusion in changing from http to https, your article is by far the most informative in making the process much easier. I’m going to follow these steps to change mine. My web host is including the ssl certificate and for renewal too, so that is one cost not to worry about. Might be a good idea for those looking for or want to change their hosting, to have it included. Thank you very much!
Thanks for such a descriptive article. But after migrating to HTTPS website ranking goes down many times, then how to handle this situation.
Thank you so much Alex for writing this informative blog post about how to migrate a website to https version without loosing SEO or anything from search ranking. Since i have not yet implemented it on my websites but sooner or later i will need to switch from http to https to avoid issues from google as they have already mentioned this is one of the major signal for ranking and i might be loosing behind just because of not switching to https. But, before that there are various things that need to be considered in order to avoid and loss due to proper homework. Your post will really help me a lot while migrating from http to https version. Keep up the great work!
Thanks for the insightful information, I was in dire need of this information as switching to https leaves behind a lot of loopholes which can later destroy the whole website.
Alex this is a great post, thank you, a quick question for you. In a published book we use a bit.ly url which points to an http url on our own site. If we switch to the https version of this url will the bit.ly url still point through to the same page? If not can we set up a protocol which ensures it does?
Hi
If you follow the steps and setup 301 redirections, everything will work ok.
Thanks
thanks alex, appreciated
Thanks a lot for this information, especially the search and replace plugin step and configuration ans sharing the link for the Whynopadlock site. Saved me probably days of tinkering with my site figuring out why I was getting the “I” symbol instead of the padlock symbol. Apart from the the links within the content it turned out that my logo was being pulled from the http version of the site instead of the https version.
earlier I was not sure that https will be one of factor in SEO I am going to install by using your instruction and after few days I will share the result
Thank you Alex
I really wanna change to https from http but I’m afraid I will lose all my SEO rankings, someone told me he have done it before and did the right process but he somehow still lose his SEO. Can someone help me if this is true.
Hello Alex,
Thank You for your article and instruction which was really helpful. Especially General section, Search Console, site xml details. Much appreciated.
Once I have done the https changes in General, Yoast plugin found the change and instructed (notification) me to optimize it.
Once optimized, all the internal links has changed automatically from http to https. It was really easy and helpful which means I don’t need to touch anything in the DB.
Hope this future might be useful for those who are going to migrate.
Thank You