Commons:ComeOn!
ComeOn! is a free tool for importing jpeg-pictures or sound clips to Wikimedia Commons. It is able to extract pieces of metadata from picture files to insert them into the file description in Commons. It is also able to fetch metadata from an external file.
You may use ComeOn! when :
- You have a lot of pictures to upload and you don’t want to lose time on the Upload Wizard.
- You want to add rich descriptions and categories to your files without editing them one by one in Commons.
- You already described your pictures in your editing software (Lightroom, etc.)
- You want to fetch information about your files from an external catalog, like a museum’s catalog extract.
User guide[edit]
Prerequisites[edit]
ComeOn! may be launched on a computer (Windows, Linux ou macOS) where Java 8 or more for 64 bit architecture is installed. It relies on Java Web Start (fr,de) which is installed with Java.
ComeOn! only supports format JPEG format for pictures. Picture metadata are extracted by the Metadata Extractor library by Drew Noakes, in the limits that this library supports by itself.
External metadata may be read from a CSV file with fine format tweaks.
ComeOn! uses templates to generate the file description pages. You will have to prepare at least one template before you begin uploading files. You may find a set of basic templates on Github that you may download and extract to your computer.
Launching[edit]
Follow this link to launch ComeOn!.
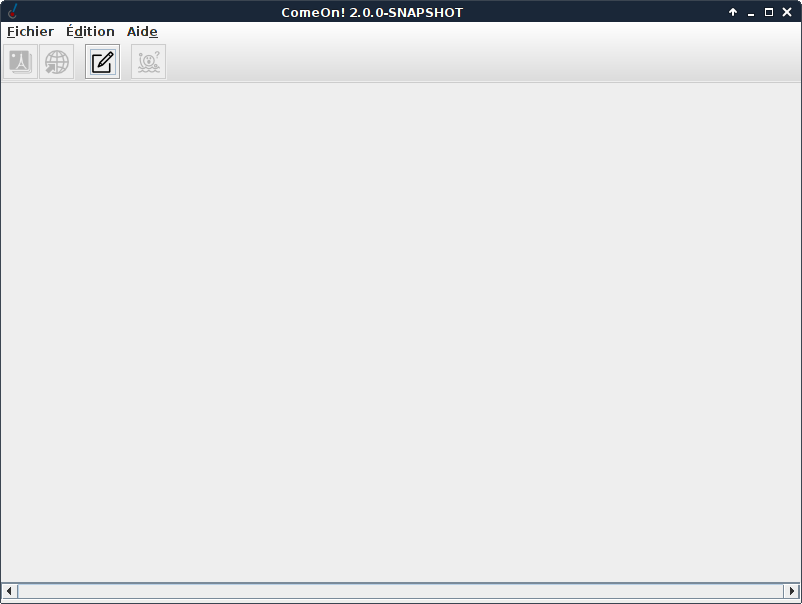
At this point, you have no other choice than configuring or leaving the program. To configure, open the Edit ▸ Options menu or click the Options button in the toolbar.
Options[edit]
The options windows is used to set the models for the generation of the description pages of the pictures (Options ▸ Templates tab) and the accounts used to connect to the wikis (Options ▸ Wikis tab). To use ComeOn!, you need to configure at least one template and a wiki.
Templates[edit]
A template is a file, in a specific templating language, used by ComeOn! to generate the description page of each uploaded media file. As of today, ComeOn! supports only one templating language: Velocity.
== {{int:filedesc}} ==

{{Information
 | Description = {{mld
    | en = $Iptc.CaptionAbstract
   }}
 | Source = {{own}}
 | Date = $date
 | Author = $user.displayName ([[User:$user.login]])
 | Permission = {{cc-by-sa-4.0|$user.displayName}}
}}
#if ($GPS.GPSVersionID == "2.200")
#parse ("includes/gps.vm")
#end
Before adding templates to ComeOn!, these one must be put on your computer, at the location you like. ComeOn! is delivered without any template but you may download a few ones from Github and use them as an inspiration.
To add a template to ComeOn!, click on the Options ▸ Templates ▸ Add button.
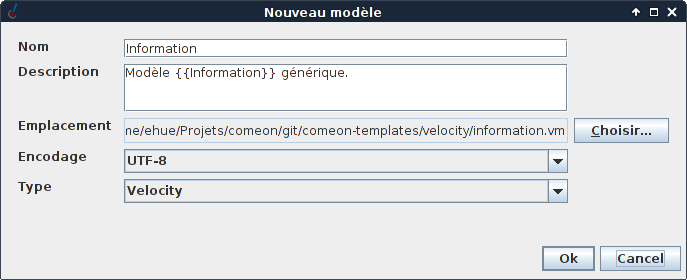
ComeOn! displays the template configuration window. On this screen capture, the form is already filled with example values.
| Field | Usage |
|---|---|
| Name | Name of the template for ComeOn! to display |
| Description | Helper information to describe the content of the template. |
| Location | Select the location of the template file on your computer. |
| Charset | Character encoding to be used by ComeOn! to read the template file. |
| Kind | The templating engine to use with this model. Only Velocity is supported at the moment. |
Templates ▸ Edit and Templates ▸ Remove buttons are used to change the settings for a template or to remove it from the list.
Wikis[edit]
You may configure ComeOn! to upload files to several wikis. Commons is mostly used amongst the Wikimedia projects but ComeOn! supports any recent Mediawiki instance. To make things easier, Wikimedia Commons is pre-configured in ComeOn!, you only have to set your credentials.
To set your Commons credentials, open the Options ▸ Wikis window, select the Commons entry from the list and click the Edit button. On first launch, only the two first fields are set, you need to set the remaining three.
| Field | Usage |
|---|---|
| Name | The name of the wiki, used by ComeOn! for display |
| Description | Reminder to describe the wiki. |
| Display name | The full text name you want to use in this wiki, in attributions for example. |
| Login | The login you use to connect to this wiki. |
| Password | The password of your wiki account. |
Adding a wiki works the same way, only add a name and description.
You may remove the wikis you don’t need anymore from the list.
A star identifies the active wiki. Only one wiki may be active at a time. The active wiki settings are used when generating description pages and uploading. Don’t use the wrong wiki!
Once you have set your templates and credentials, click OK to save your options.
Uploading pictures[edit]
As soon as templates and wikis are set up, a button becomes active in the toolbar of the main window. The ![]() button is used to upload images. The same operation may be reached with the File ▸ Open media menu or by dragging and dropping files in the main window.
button is used to upload images. The same operation may be reached with the File ▸ Open media menu or by dragging and dropping files in the main window.
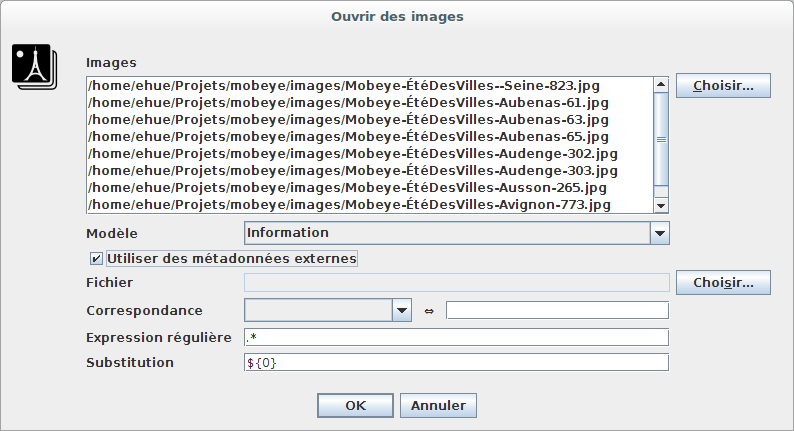
ComeOn! displays the media selection window below:
If you drag and drop files, they are directly listed in the window. Else, click the Pick… button to open a file chooser and select the media to upload. Then choose a template in the dropdown list and click OK to open the selected files.
Using external metadata[edit]
ComeOn! can read information from an external CSV file, match it with selected and insert it into the description page. This chapter is about the way ComeOn! matches external file data with media; see next chapter about the way to insert this information into the description pages.
This features activates with a click of the Use external metadata checkbox in the media selection dialog.
Choose the metadata file with a click of the Pick… button. The next dialog sets tweaks the precise file format.
| Field | Usage |
|---|---|
| Separator | Character used to separate fields – usually a comma or a semicolon. |
| Quote | An optional character used to quote fields – usually a straight double quotation mark. |
| Escape | Character preceding other special characters to avoid them being interpreted as such – usually a backslash. |
| Lines to skip | Number of lines to be ignored at the beginning of the file, if these are plain text comments as an example. |
| Strict quoting | When this checkbox is ticked, ComeOn! ignores all text outside of quotes. |
| Ignore leading white space | ComeOn! ignores all blank characters at the beginning of fields. |
| Charset | Select the charset that what used to save the file. |
One need to specify how to match each line of the metadata file with a media, using the Match fields. For each media, ComeOn! extracts information from the file, using the expression from the right field, and searches for a match in the column chosen in the left field.
Par défaut, ComeOn! recherche une correspondance exacte, mais l’information extraite de l’image peut être modifiée en utilisant les champs Expression régulière et Substitution. Au moment de l’ouverture des images, ComeOn! réalise les opérations suivantes, dans cet ordre :
- Extraction de la métadonnée indiquée par l’expression de droite saisie dans Correspondance.
- Application de l’expression régulière sur cette valeur.
- Construction d’une nouvelle valeur en insérant les groupes collectés à l’étape précédente dans la chaîne de caractères saisie dans Substitution.
- Recherche exacte de cette nouvelle valeur dans la colonne sélectionnée dans Correspondance.
| Chaîne en entrée | Expression | Substitution | Résultat | Explication |
|---|---|---|---|---|
| Mobeye-ÉtéDesVilles-Veyrines-de-Domme-210.jpg | .* | ${0} | Mobeye-ÉtéDesVilles-Veyrines-de-Domme-210.jpg | Toute la chaîne en entrée est renvoyée telle quelle. |
| Mobeye-ÉtéDesVilles-Veyrines-de-Domme-210.jpg | (.*?)\.jpg | ${1} | Mobeye-ÉtéDesVilles-Veyrines-de-Domme-210 | L’expression sélectionne dans un groupe la partie avant l’extension du nom du fichier. La substitution ne conserve que ce groupe. |
| Mobeye-ÉtéDesVilles-Veyrines-de-Domme-210.jpg | Mobeye-ÉtéDesVilles-(.*?)-(\d+)\.jpg | ${2}_${1} | 210_Veyrines-de-Domme | L’expression ignore les deux premiers composants du nom et sélectionne les deux derniers dans deux groupes. La substitution conserve ces deux groupes en les inversant. |
Preparing the description pages[edit]
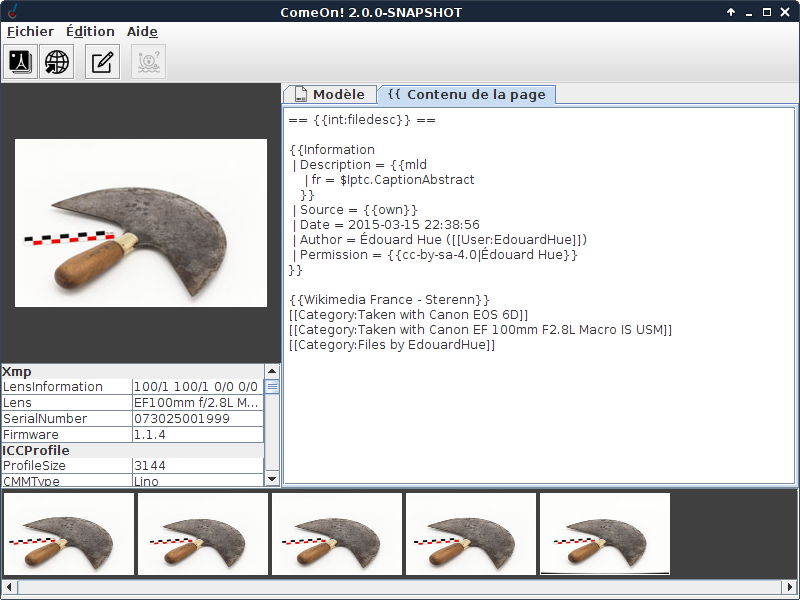
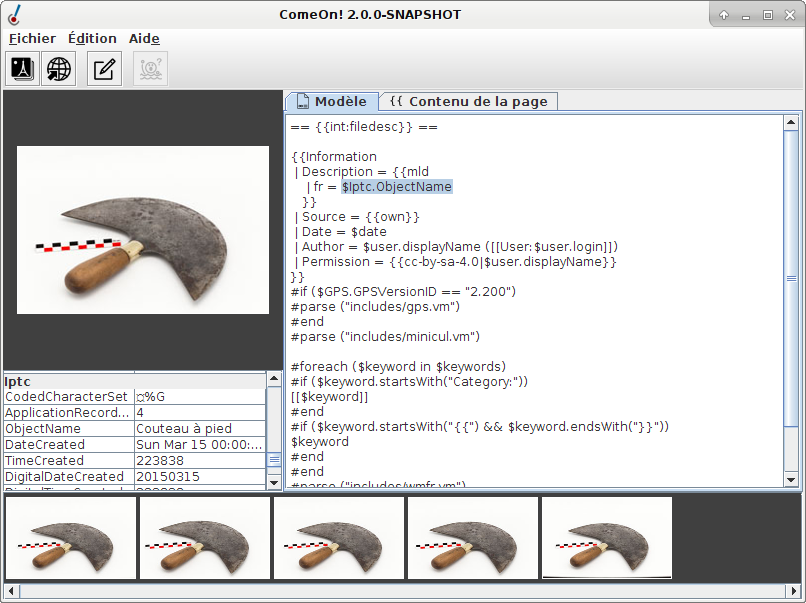
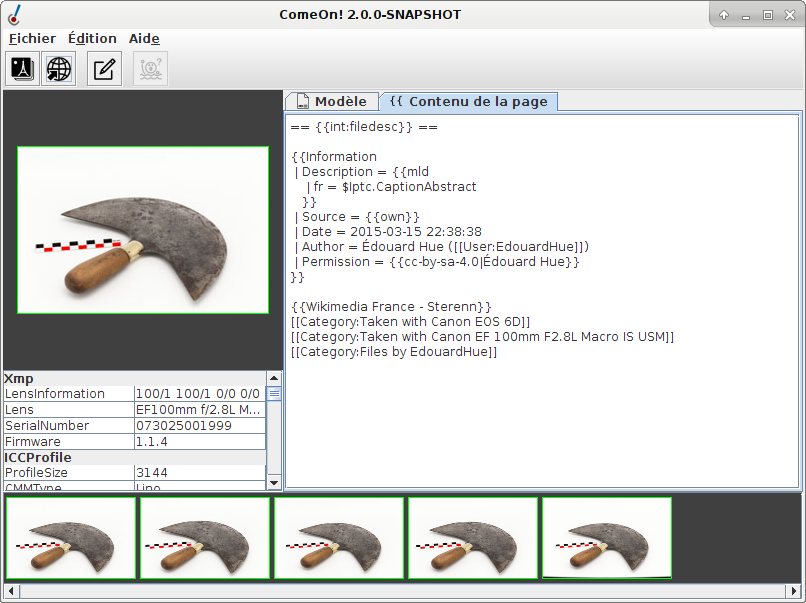
Après l’ouverture des images, la fenêtre principale est découpée en trois zones. En bas, un bandeau affiche les miniatures des images, comme un rouleau de pellicule. En cliquant sur une vignette, on sélectionne cette image. Le panneau de gauche affiche une vignette plus grande de l’image sélectionnée et la liste des métadonnées contenues dans le fichier. Enfin, le panneau principal contient, dans deux onglets, le texte du modèle et le texte de la future page de description de l’image sélectionnée.
Vous pouvez apporter des ajustements aux modèles et aux pages de description avant de verser vos images. Lorsque vous faites un chamengent dans l’onglet Modèle, celui-ci est automatiquement pris en compte quand vous revenez sur l’onglet Contenu de la page.
Inserting the image meta-data (EXIF) into the description pages[edit]
Vous pouvez utiliser toutes les métadonnées présentes dans une image pour construire sa page de description. Pour cela, il faut insérer cette information dans le modèle en utilisant la syntaxe propre au langage du modèle. Par exemple, avec un modèle Velocity, pour insérer la valeur du champ ObjectName du bloc EXIF Iptc, vous écririez $Iptc.ObjectName dans le modèle.
Inserting meta-data stored in an external file[edit]
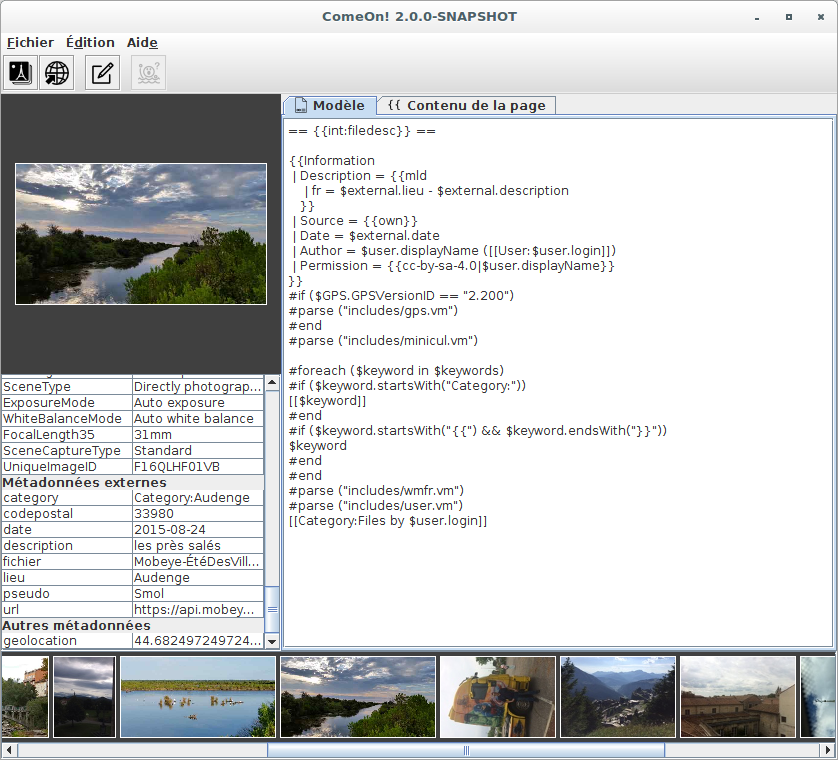
Si vous avez associé vos images à un fichier de données externes, vous pouvez insérer ces informations de la même manière que les métadonnées EXIF. Les informations externes sont regroupées dans le bloc $external, qui apparaît en bas du panneau de gauche. Par exemple, si votre fichier comprend une colonne nommée ville, vous pouvez insérer la valeur se trouvant sur la ligne associée à l’image courante avec l’expression $external.ville.
Uploading the images[edit]
Cliquez sur le bouton [[Upload icon (the Noun Project 7131).svg|16px|Bouton de téléversement des images.] ou sur le menu Fichier ▸ Téléverser les images pour démarrer le versement de toutes les images ouvertes sur le wiki actif. ComeOn! vous demande de confirmer votre action puis affiche la fenêtre de suivi du versement. Cette fenêtre affiche individuellement le pourcentage transféré de chaque fichier ainsi que l’avancement global du versement.
ComeOn! transfère deux fichiers à la fois pour optimiser l’utilisation de la bande passante. Les transferts démarrent les uns après les autres, jusqu'à épuisement de la liste. Si le transfert d'un fichier échoue, le logiciel signale l’erreur tout en passant au fichier suivant. Le bouton Arrêter interrompt le versement en cours.
Une fois le versement terminé, cliquez sur OK pour fermer la fenêtre de suivi. l’écran principal affiche une bordure colorée autour des images transférées, dans le bandeau inférieur :
| Couleur | Signification |
|---|---|
| Vert | Le transfert du fichier s'est déroulé avec succès. |
| Rouge | Le transfert a échoué et pourra être retenté. |
| Blanc | Le transfert n'a pas démarré et sera effectué au prochain déclenchement. |
